<?xml version="1.0" encoding="utf-8"?><feed xmlns="http://www.w3.org/2005/Atom" ><generator uri="https://jekyllrb.com/" version="3.10.0">Jekyll</generator><link href="http://rachelchiong.com/feed.xml" rel="self" type="application/atom+xml" /><link href="http://rachelchiong.com/" rel="alternate" type="text/html" /><updated>2026-05-18T01:12:03+00:00</updated><id>http://rachelchiong.com/feed.xml</id><title type="html">Rachel’s Blog</title><subtitle>This is Rachel&apos;s blog - containing learnings from ELEC4630 - Computer Vision and Deep Learning</subtitle><entry><title type="html">Set up a local PC as an Externally Accessible RDP</title><link href="http://rachelchiong.com/2024/04/24/rdp.html" rel="alternate" type="text/html" title="Set up a local PC as an Externally Accessible RDP" /><published>2024-04-24T00:00:00+00:00</published><updated>2024-04-24T00:00:00+00:00</updated><id>http://rachelchiong.com/2024/04/24/rdp</id><content type="html" xml:base="http://rachelchiong.com/2024/04/24/rdp.html"><![CDATA[<p>At university, many courses require specific software or setups that can only run
on a Windows machine, or require specific components, like an NVIDIA GPU. As an
avid Mac user, this can be quite frustrating as a mac, particularly a silicon mac,
cannot be used locally. While most courses do provide computer lab access or RDP
access, often these lab computers come with a lot of restrictions, and there isn’t a
guaranteed chance that the computer you’re using will be the same each time you
log in. To work around this, I’ve previously set up an RDP client for my PC at home,
which runs Windows and has an NVIDIA GPU (albeit, not a fantastic one) so that
I can still be productive whilst at university, without needing to enter the physical
lab.</p>

<p>Unfortunately for me - my WiFi router was fried by lightning at the end of
last year so I needed re-set it up. And I’d realised I had forgotten the steps and
needed to backtrace what I had done. So here’s a guide on how to set it up for yourself.</p>

<ol id="markdown-toc">
  <li><a href="#1-set-up-your-pc-on-windows-11" id="markdown-toc-1-set-up-your-pc-on-windows-11">1. Set up your PC (on Windows 11)</a>    <ol>
      <li><a href="#11-enable-remote-desktop-on-your-windows-machine" id="markdown-toc-11-enable-remote-desktop-on-your-windows-machine">1.1. Enable Remote Desktop on your windows machine</a></li>
      <li><a href="#12-get-pc-ipv4-address" id="markdown-toc-12-get-pc-ipv4-address">1.2. Get PC IPv4 address</a></li>
    </ol>
  </li>
  <li><a href="#2-configure-your-router-settings" id="markdown-toc-2-configure-your-router-settings">2. Configure your Router Settings</a>    <ol>
      <li><a href="#21-login-to-your-router" id="markdown-toc-21-login-to-your-router">2.1. Login to your router</a></li>
      <li><a href="#22-select-the-advanced-tab" id="markdown-toc-22-select-the-advanced-tab">2.2. Select the “Advanced” Tab</a></li>
      <li><a href="#23-configure-nat-forwarding" id="markdown-toc-23-configure-nat-forwarding">2.3. Configure NAT Forwarding</a></li>
      <li><a href="#24-configure-dynamic-dns" id="markdown-toc-24-configure-dynamic-dns">2.4. Configure Dynamic DNS</a></li>
    </ol>
  </li>
  <li><a href="#3-connect-to-the-pc-via-microsoft-rdp" id="markdown-toc-3-connect-to-the-pc-via-microsoft-rdp">3. Connect to the PC via Microsoft RDP</a>    <ol>
      <li><a href="#31-create-a-new-remote-connection" id="markdown-toc-31-create-a-new-remote-connection">3.1. Create a new remote connection</a></li>
      <li><a href="#32-save-user-account-details" id="markdown-toc-32-save-user-account-details">3.2. Save user account details</a></li>
      <li><a href="#33-save-the-pc-name-details" id="markdown-toc-33-save-the-pc-name-details">3.3. Save the PC name details</a></li>
    </ol>
  </li>
</ol>

<h2 id="1-set-up-your-pc-on-windows-11">1. Set up your PC (on Windows 11)</h2>
<h3 id="11-enable-remote-desktop-on-your-windows-machine">1.1. Enable Remote Desktop on your windows machine</h3>
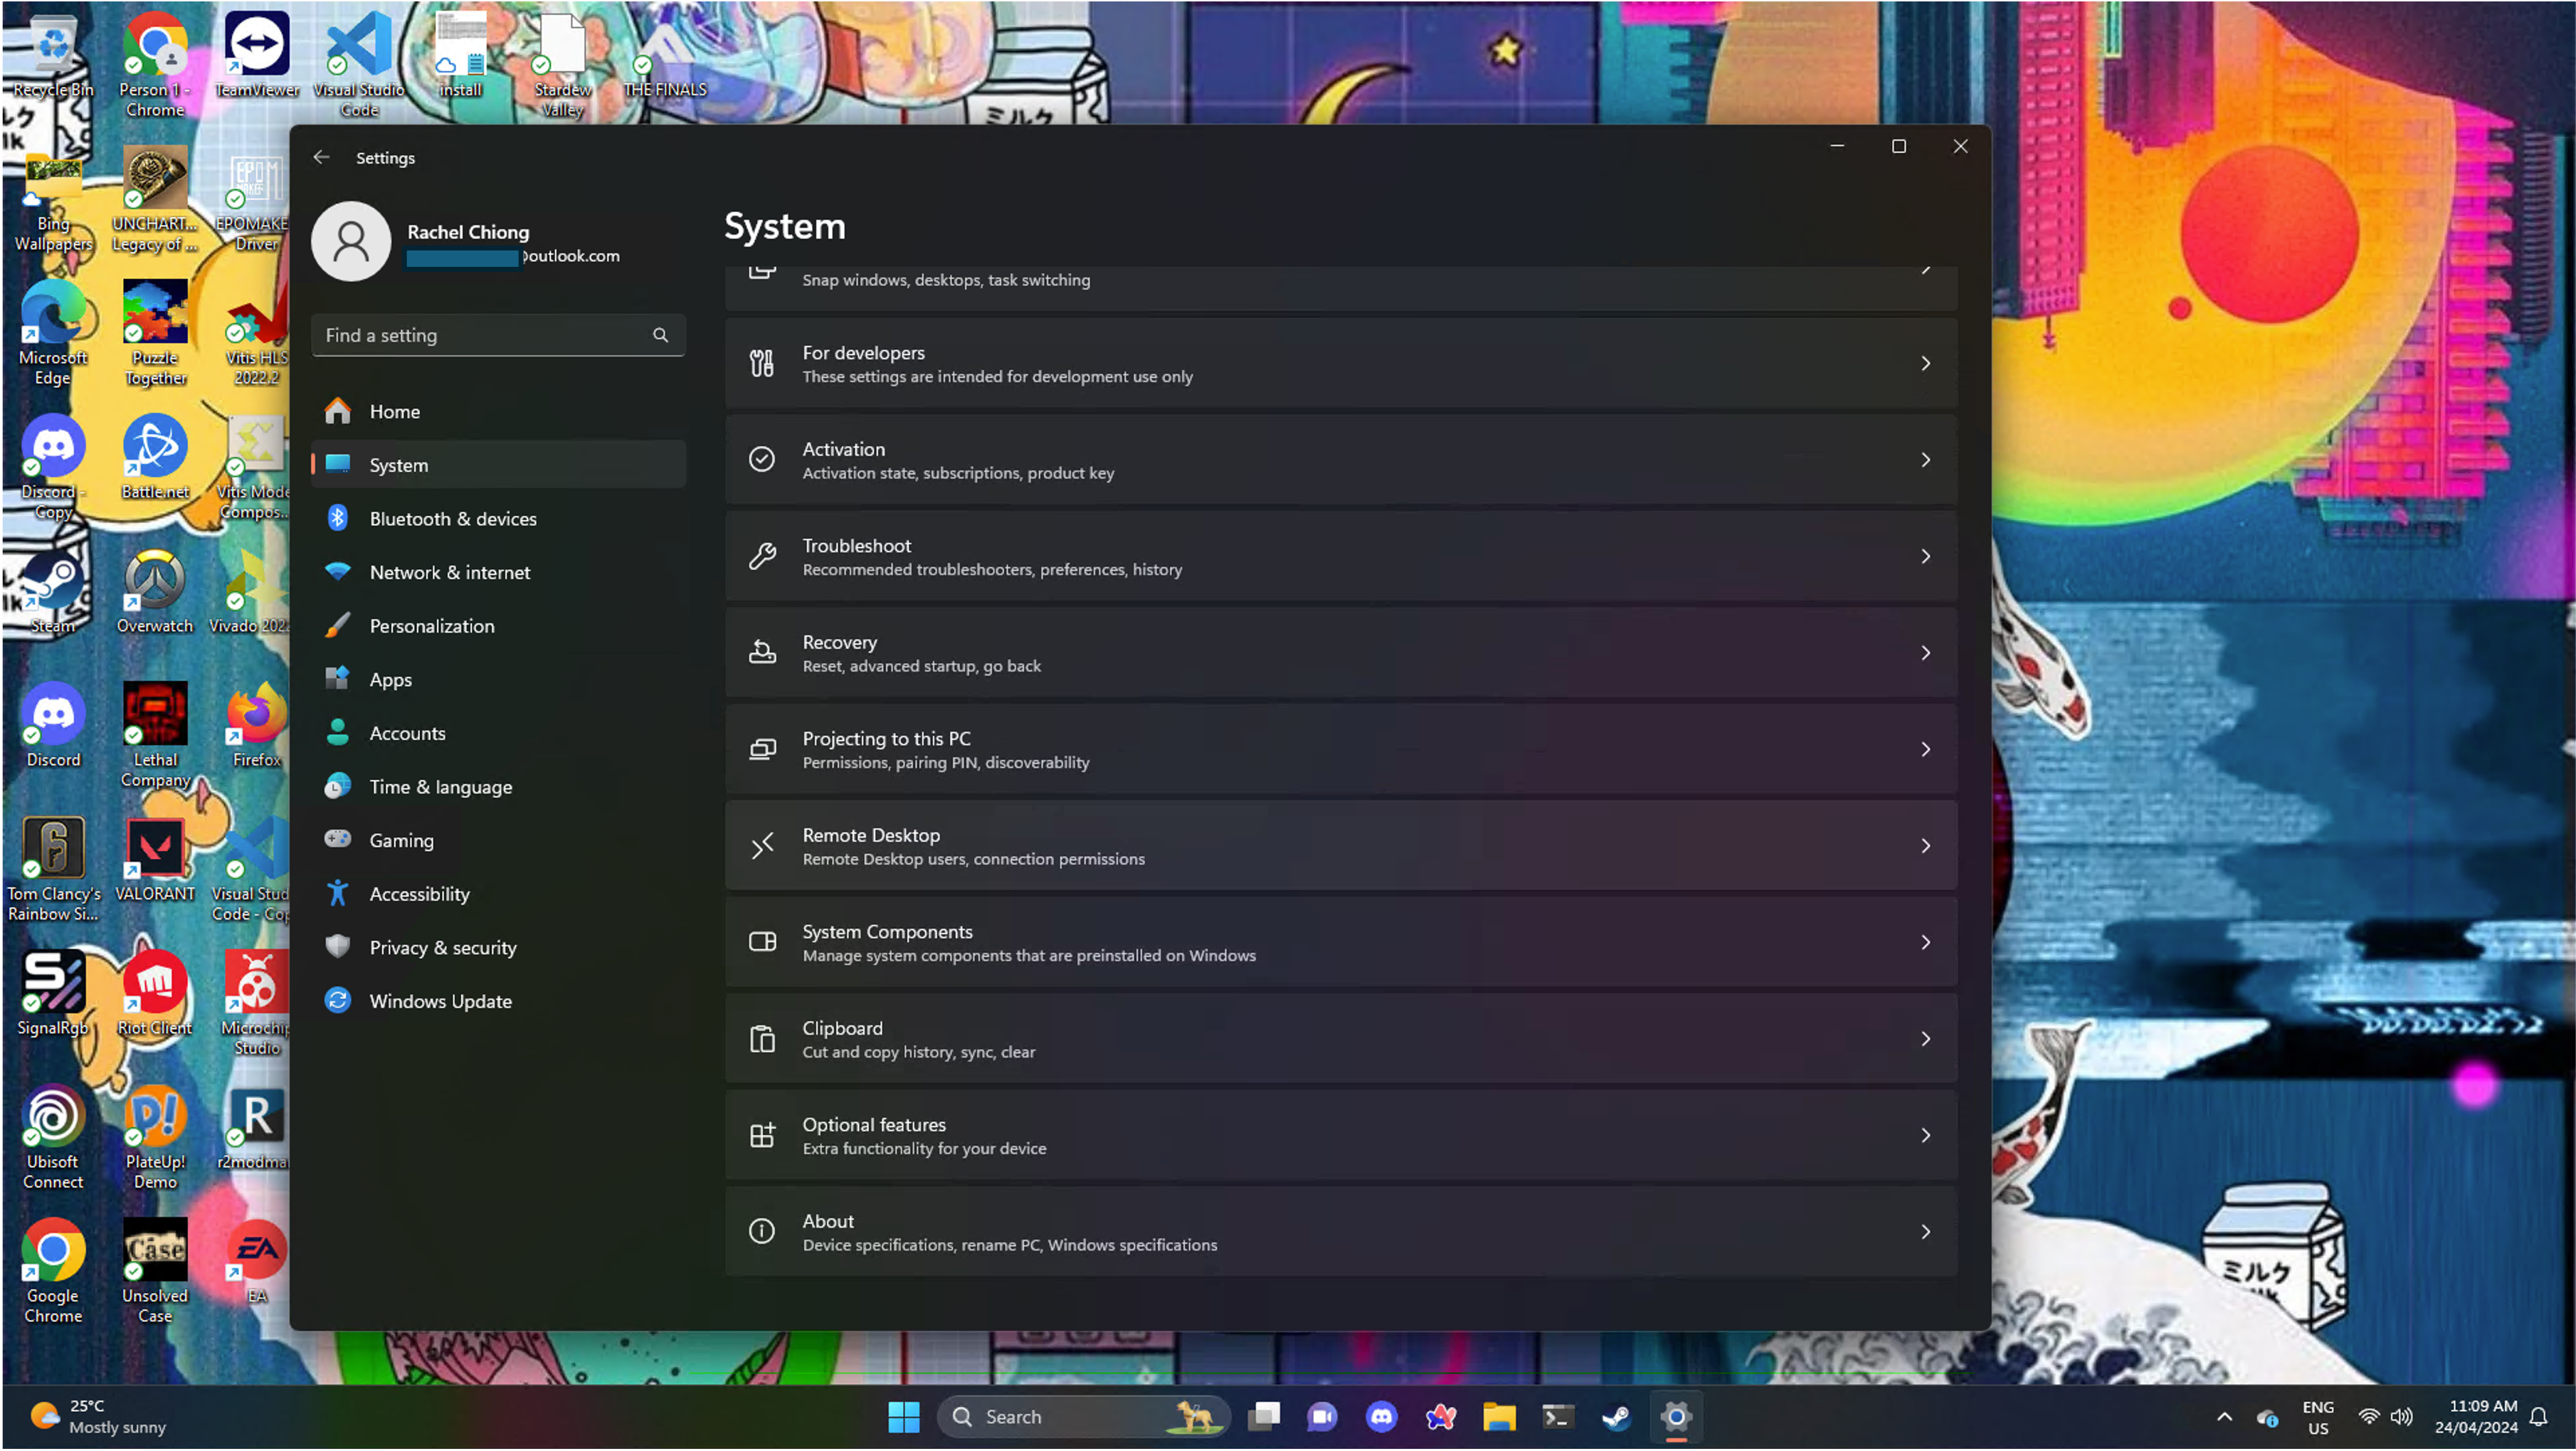
<p>Navigate to the settings menu and select the “Remote Desktop” option.</p>
<p style="text-align: center;"><img src="/images/2024-04-24/1.1.png" alt="Screenshot of Windows 11 settings menu showing the Remote Desktop settings option" /></p>

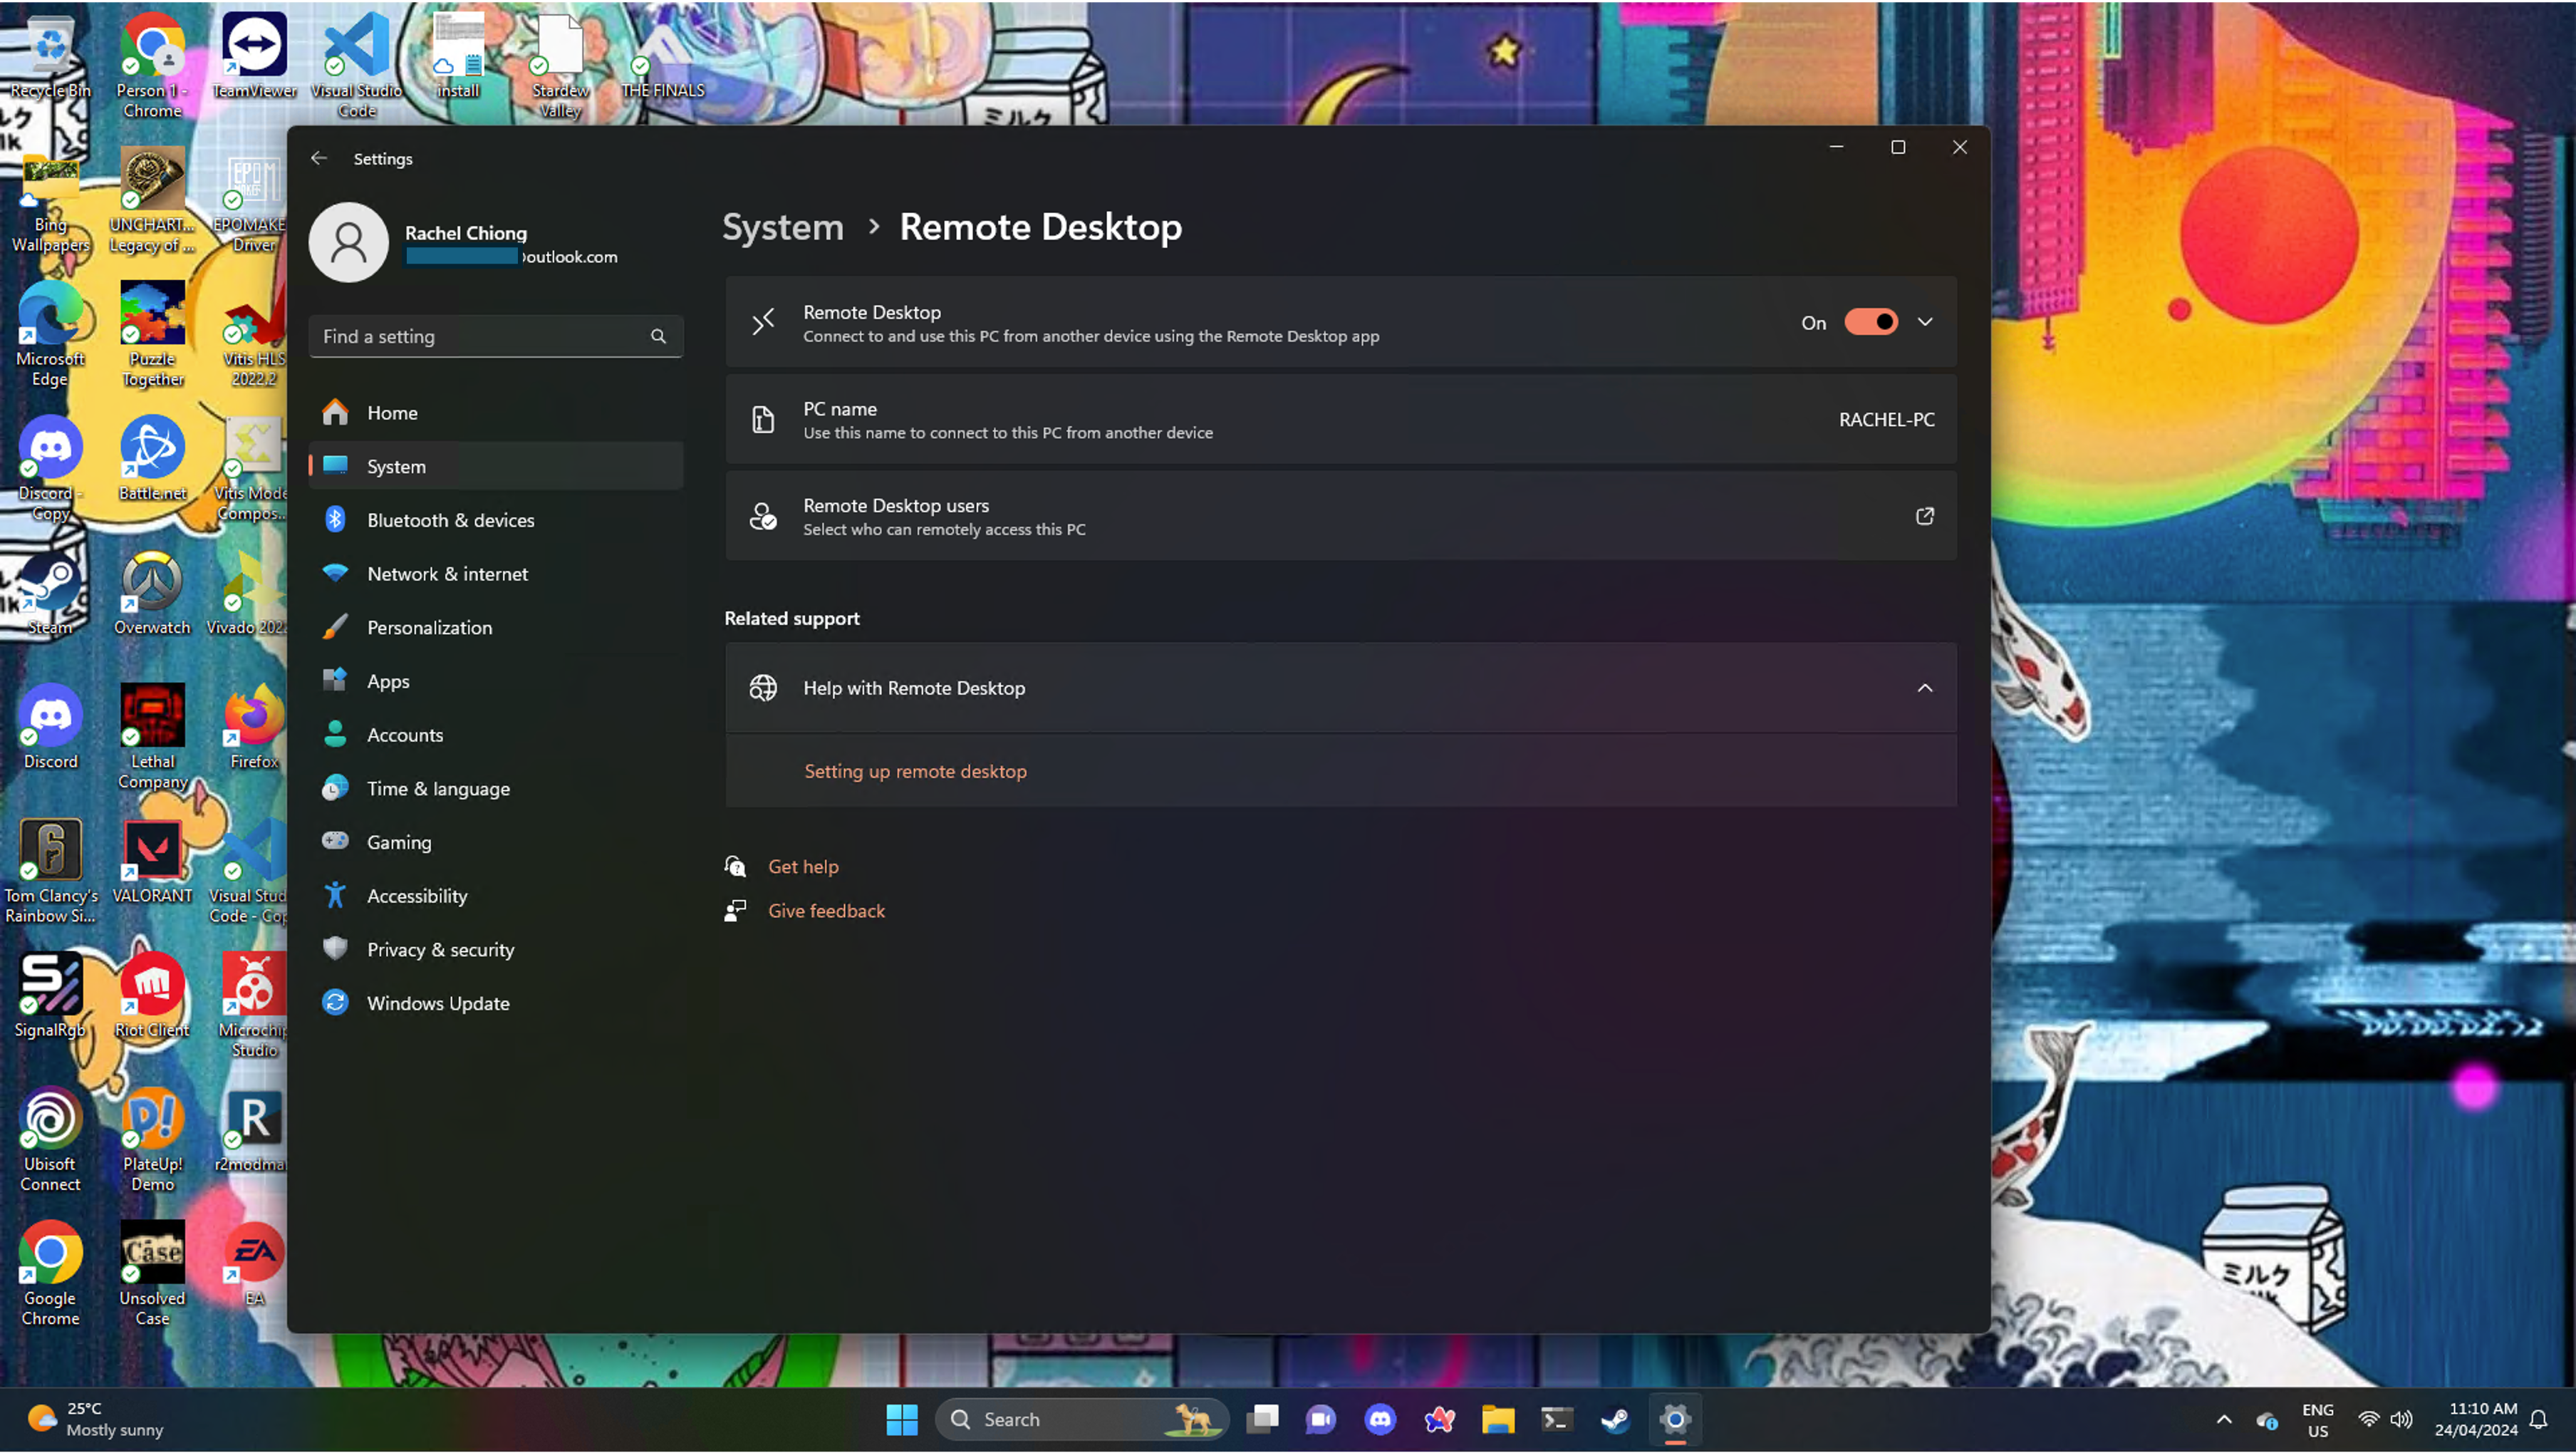
<p>Then, turn <code class="language-plaintext highlighter-rouge">ON</code> the Remote Desktop Setting. <em>Optional</em>: You can rename your PC here to something more meaningful if you wish.</p>
<p style="text-align: center;"><img src="/images/2024-04-24/1.2.png" alt="Screenshot of Windows 11 Remote Desktop Settings showing the ON button" /></p>

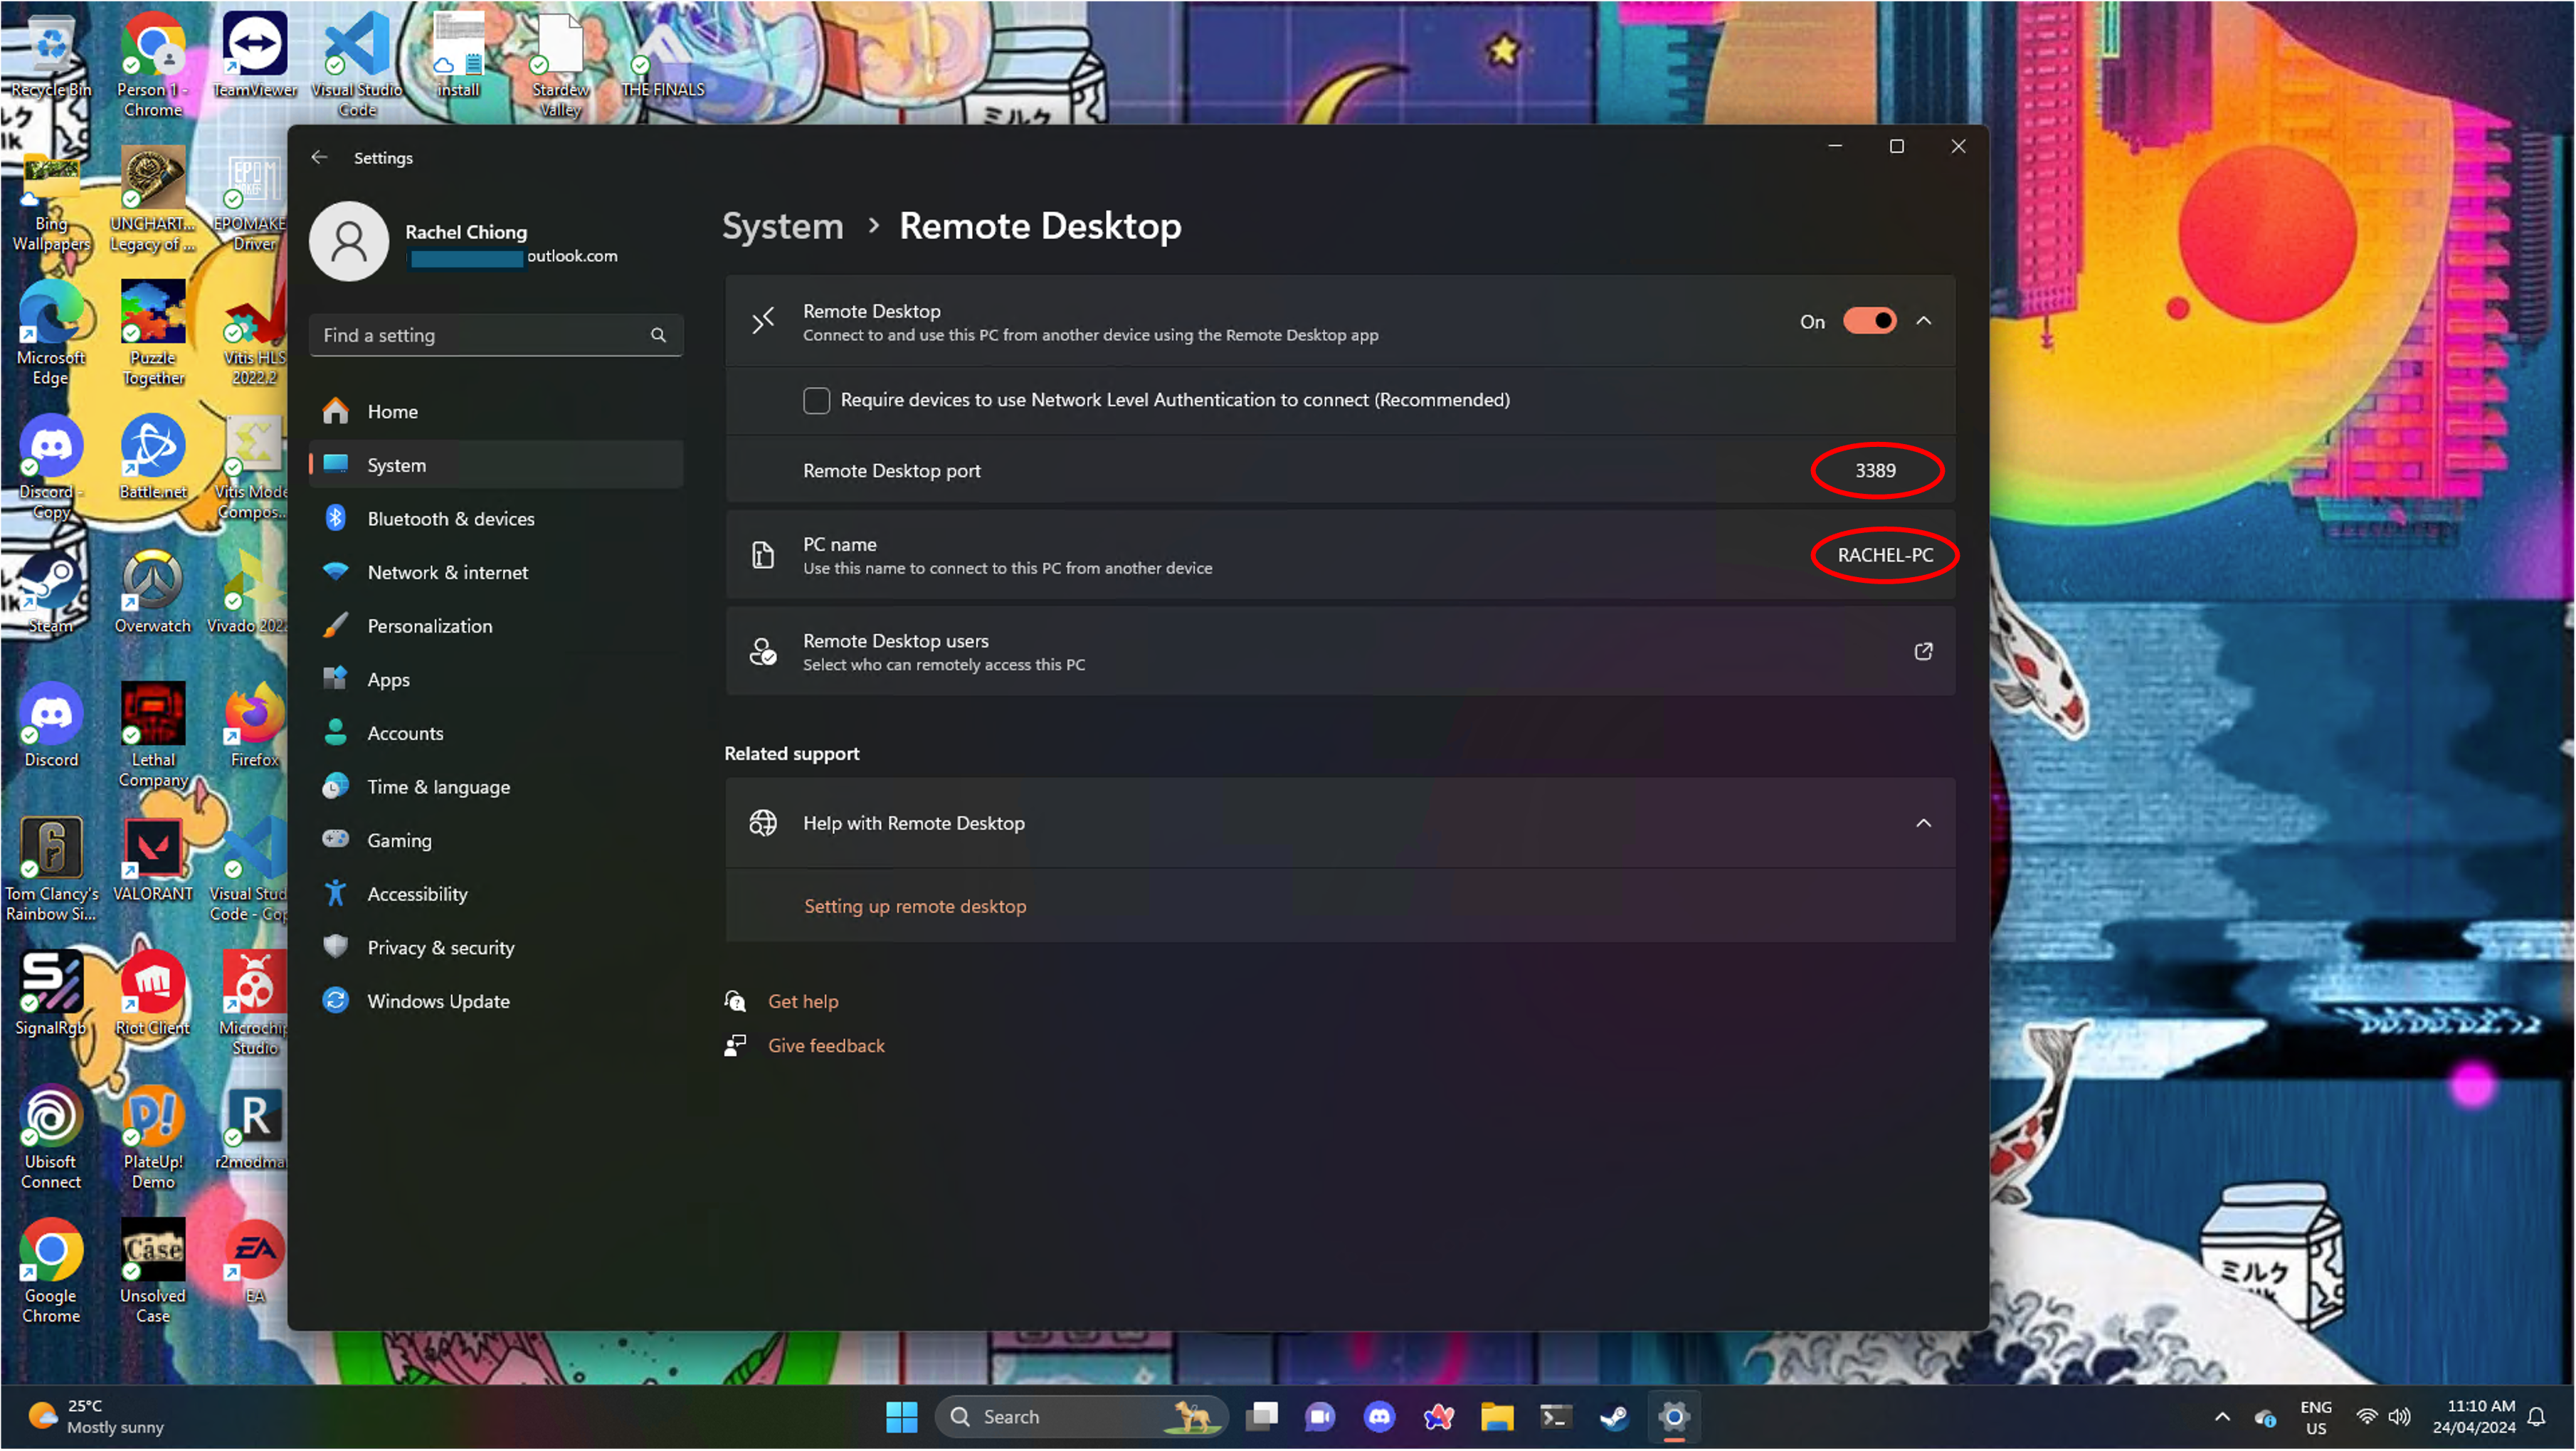
<p>You can click the dropdown menu to see what port is listed. It will most likely be <code class="language-plaintext highlighter-rouge">3389</code>. Note this down for later.</p>
<p style="text-align: center;"><img src="/images/2024-04-24/1.2b.png" alt="Screenshot of Windows 11 settings menu showing the Remote Desktop settings with port number" /></p>

<h3 id="12-get-pc-ipv4-address">1.2. Get PC IPv4 address</h3>
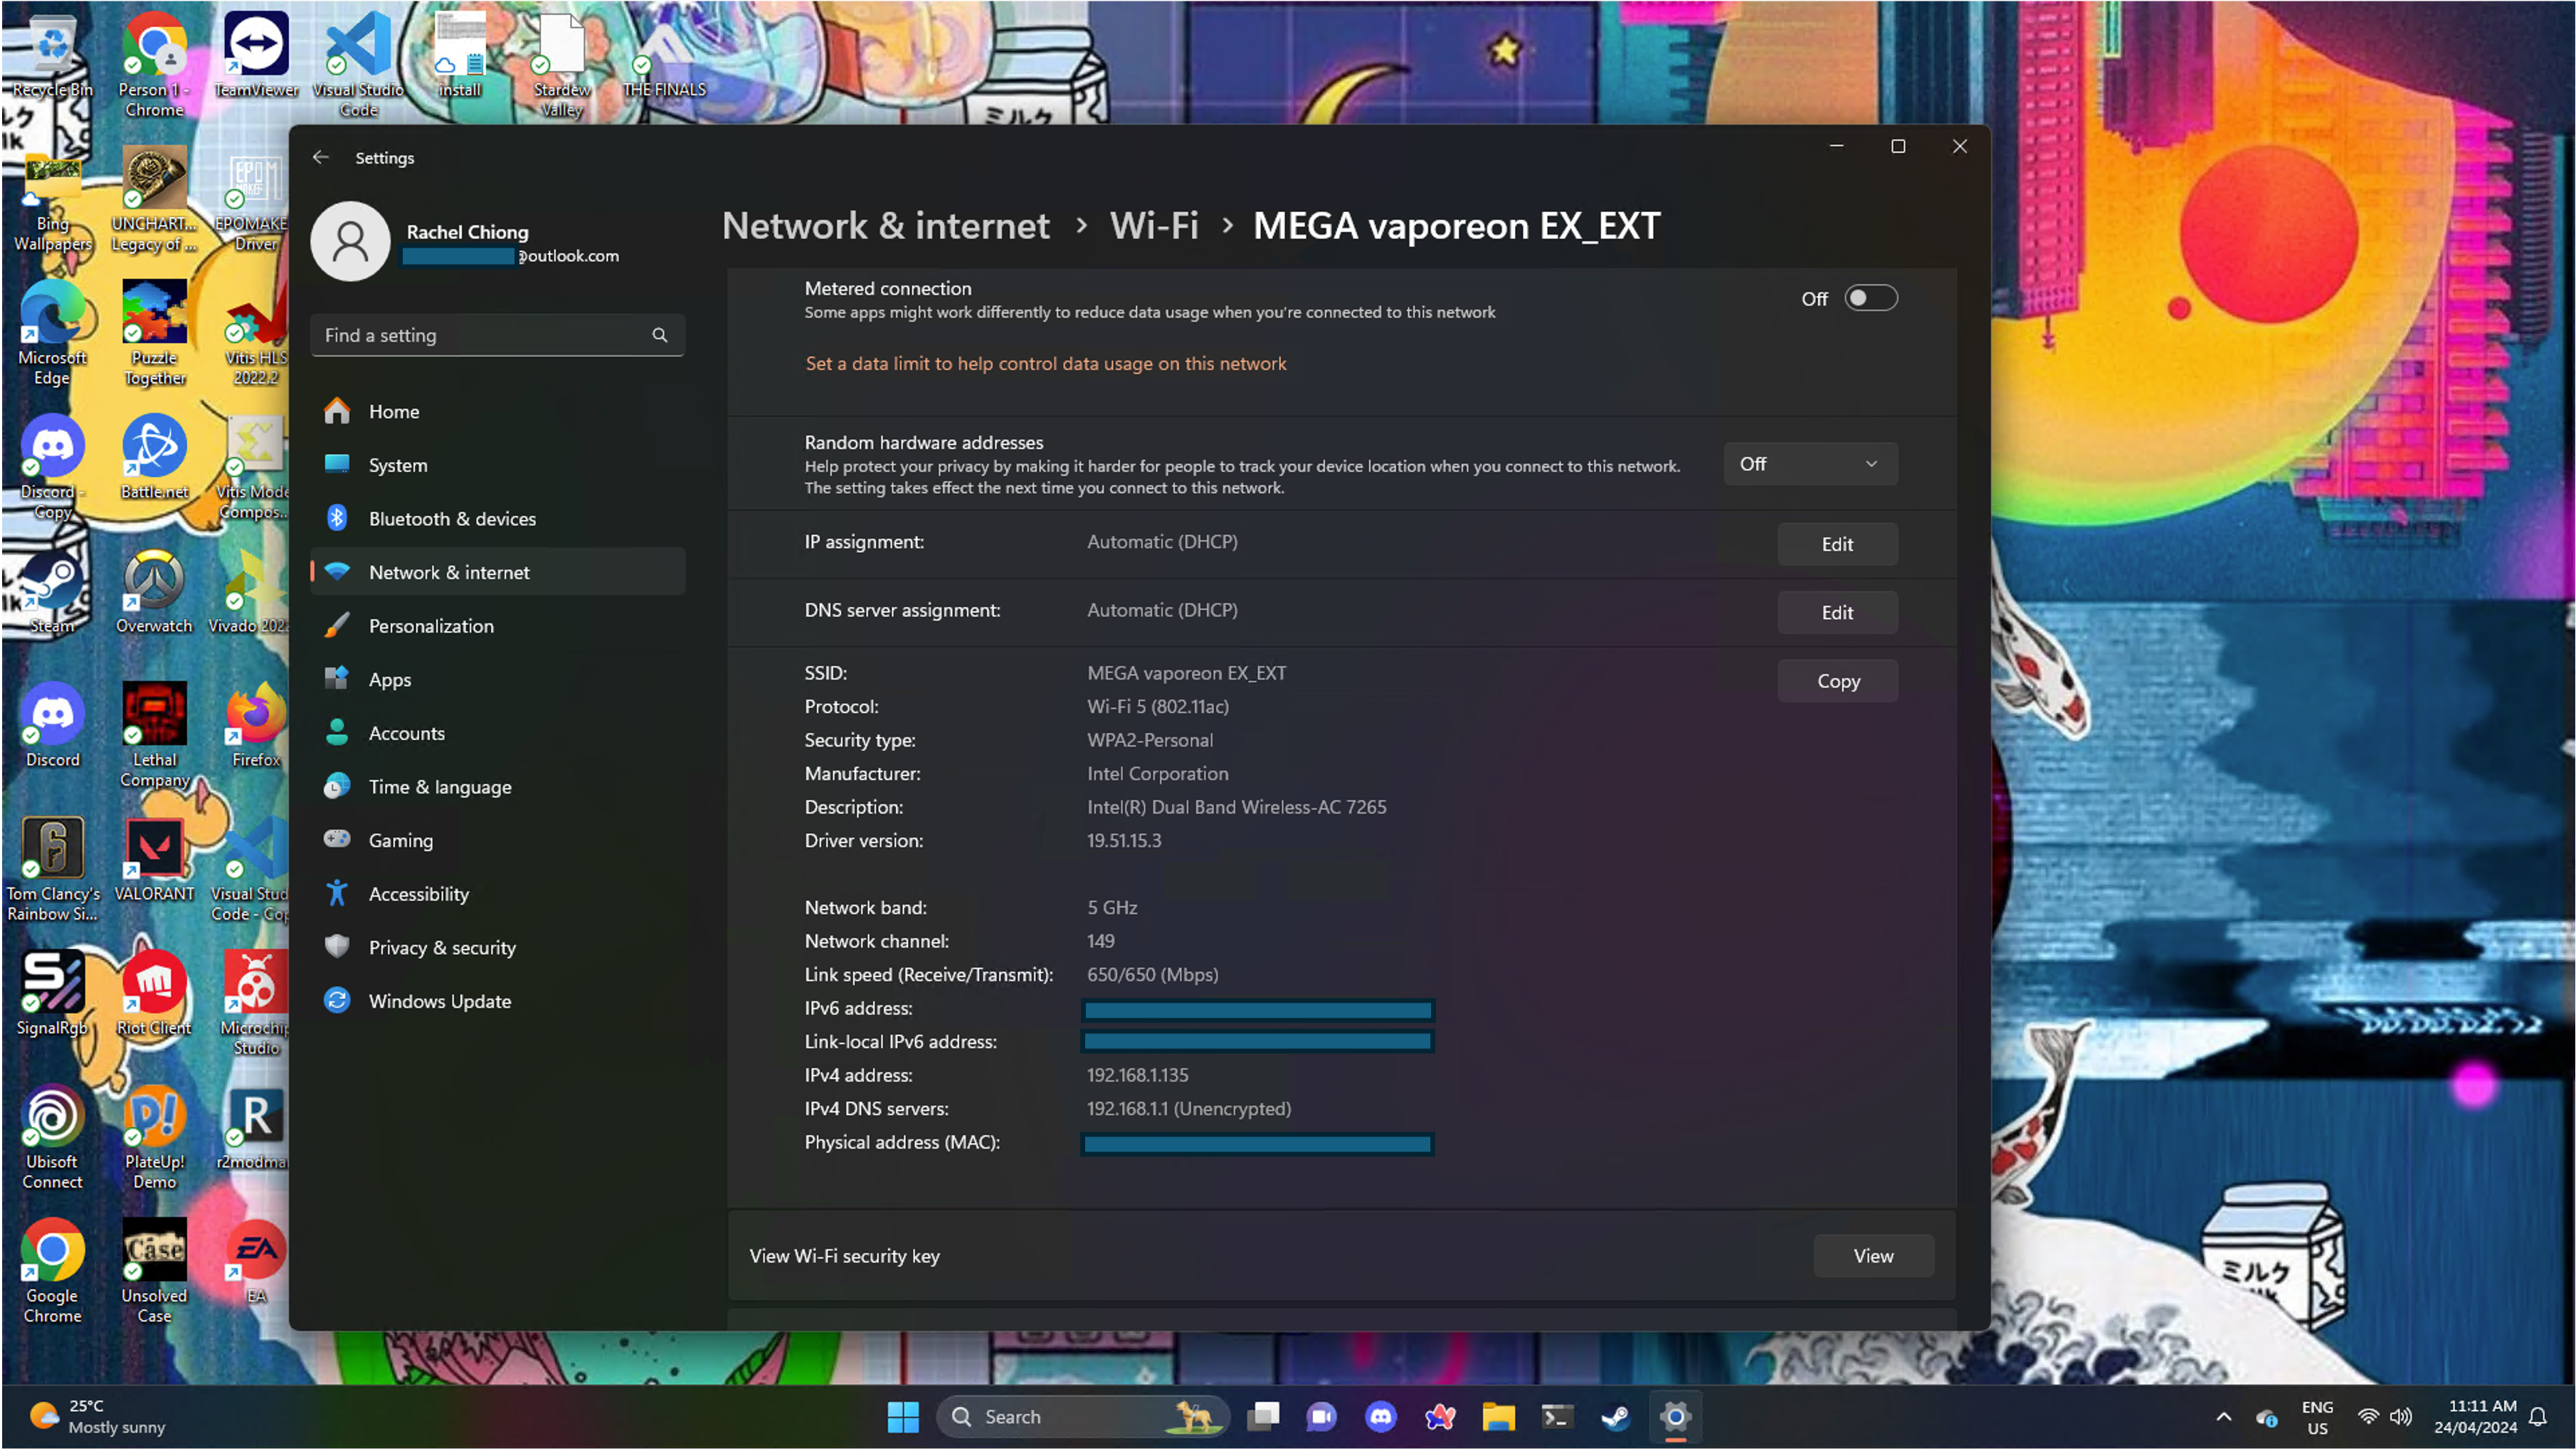
<p>Navigate to the Wi-Fi settings by selecting the <code class="language-plaintext highlighter-rouge">Network &amp; Internet</code> settings tab. Select the Wi-Fi connection your PC is connected to and note down the IP Address. For this specific PC, it’s <code class="language-plaintext highlighter-rouge">192.168.1.135</code>.</p>
<p style="text-align: center;"><img src="/images/2024-04-24/1.3.png" alt="Screenshot of Windows 11 settings menu showing Wi-Fi settings and IPv4 Address" /></p>

<h2 id="2-configure-your-router-settings">2. Configure your Router Settings</h2>
<h3 id="21-login-to-your-router">2.1. Login to your router</h3>
<p>This can usually be accessed via the web by accessing the IP:</p>
<div class="language-plaintext highlighter-rouge"><div class="highlight"><pre class="highlight"><code>http://192.168.1.1/
</code></pre></div></div>
<p>I’m using a TP-Link router, so the steps I’ll show will be directly related to their interface. But most other routers will have similar configuration screens. It doesn’t matter whether you complete this on your PC or your other machine - as long as it is connected to the same network.</p>

<h3 id="22-select-the-advanced-tab">2.2. Select the “Advanced” Tab</h3>

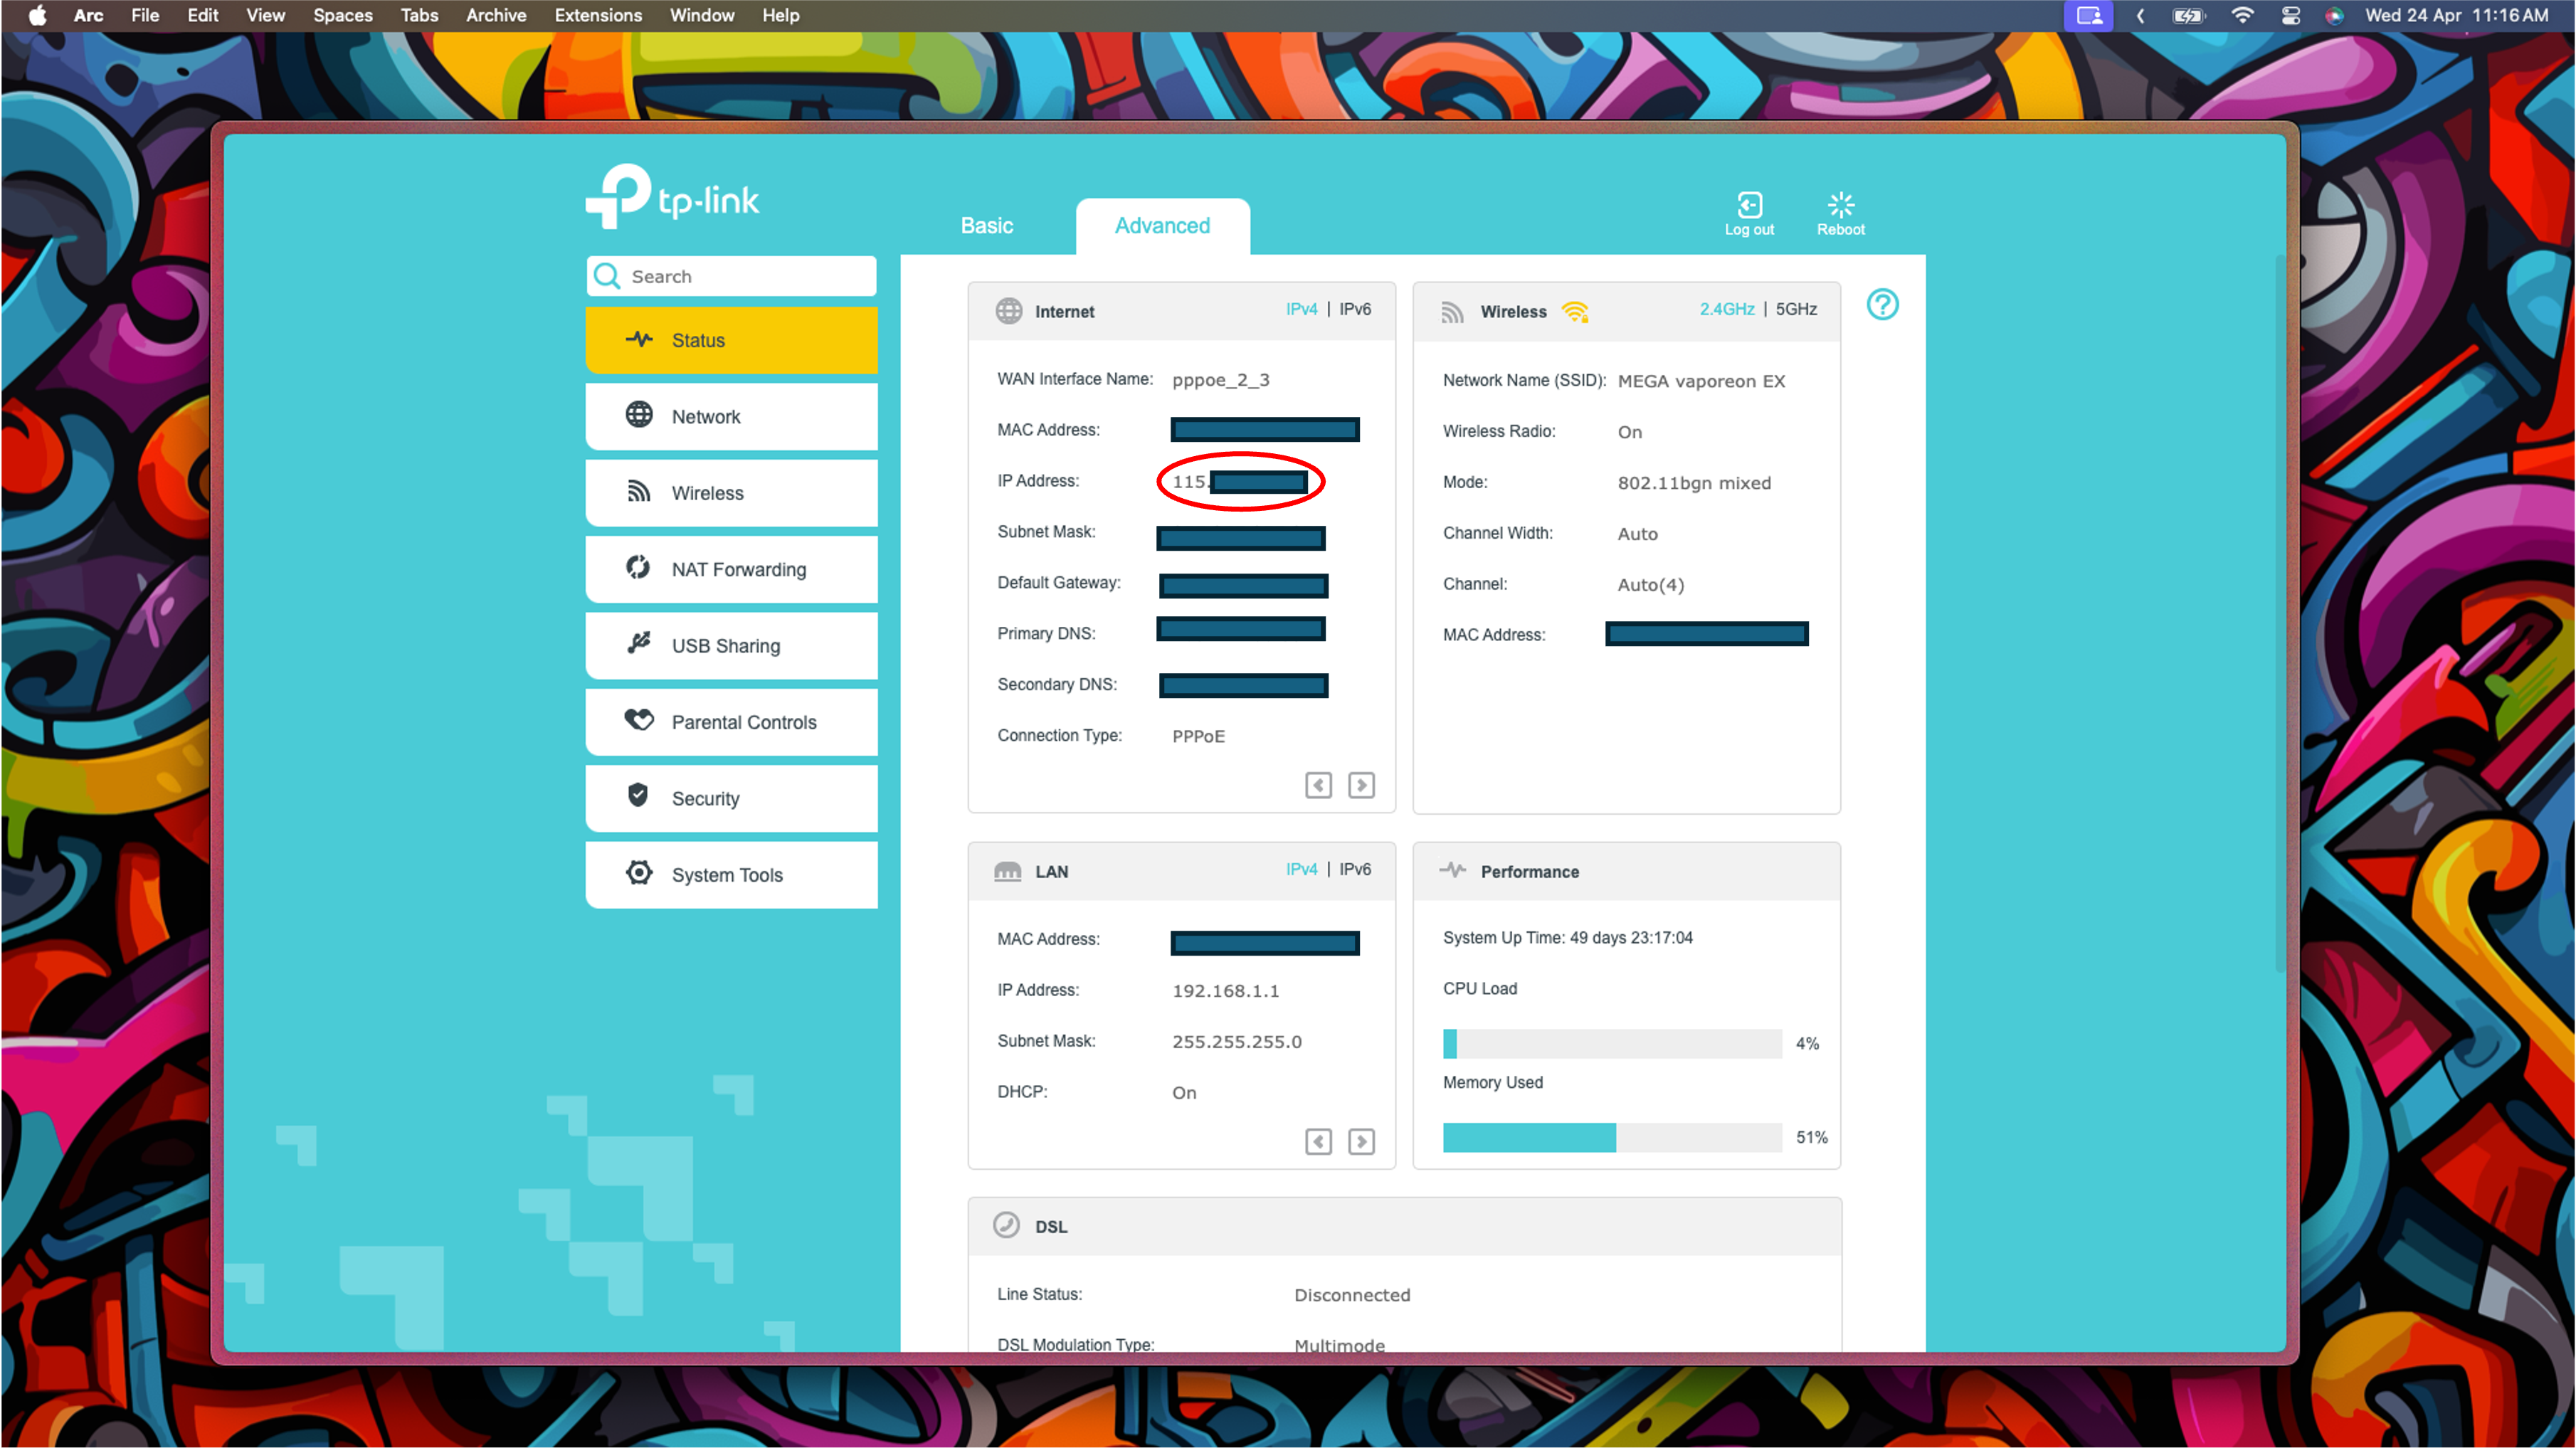
<p>Note down the public IP address on the main page (IPv4).</p>
<p style="text-align: center;"><img src="/images/2024-04-24/2.1.png" alt="Screenshot of TP-Link Router settings" /></p>

<h3 id="23-configure-nat-forwarding">2.3. Configure NAT Forwarding</h3>
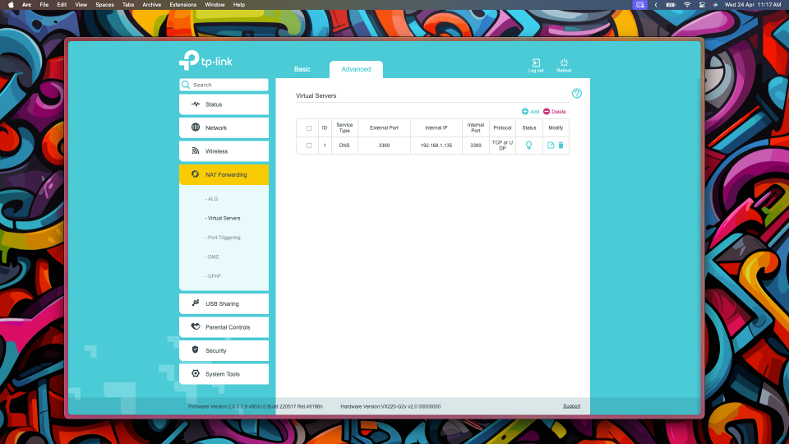
<p>Click on the “NAT Forwarding” tab and select “Virtual Servers”. You’ll need to expose the RDP port (the one that we noted down from earlier) so that it is accessible remotely.</p>
<p style="text-align: center;"><img src="/images/2024-04-24/2.2.png" alt="Screenshot of the TP-Link Router NAT Forwarding Settings" /></p>

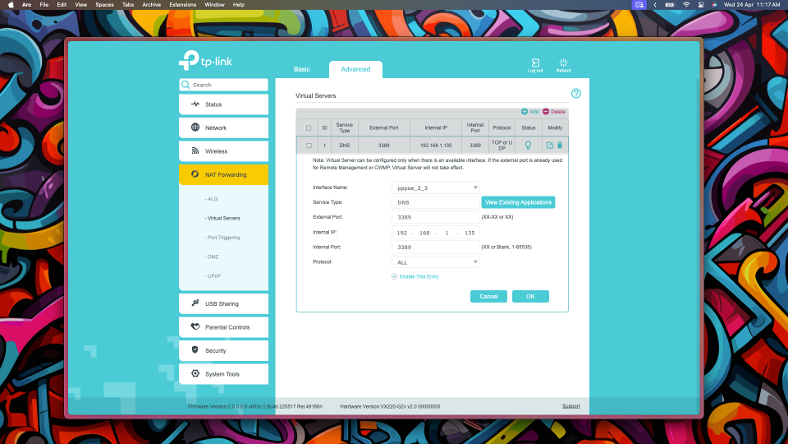
<p>Click on the “Add” button and fill in the port and internal IP address (the IPv4 address noted down from your PC). The rest of the settings should as shown in the image below.</p>
<p style="text-align: center;"><img src="/images/2024-04-24/2.3.png" alt="Screenshot of TP-Link Virtual Servers Configuration Menu" /></p>

<h3 id="24-configure-dynamic-dns">2.4. Configure Dynamic DNS</h3>
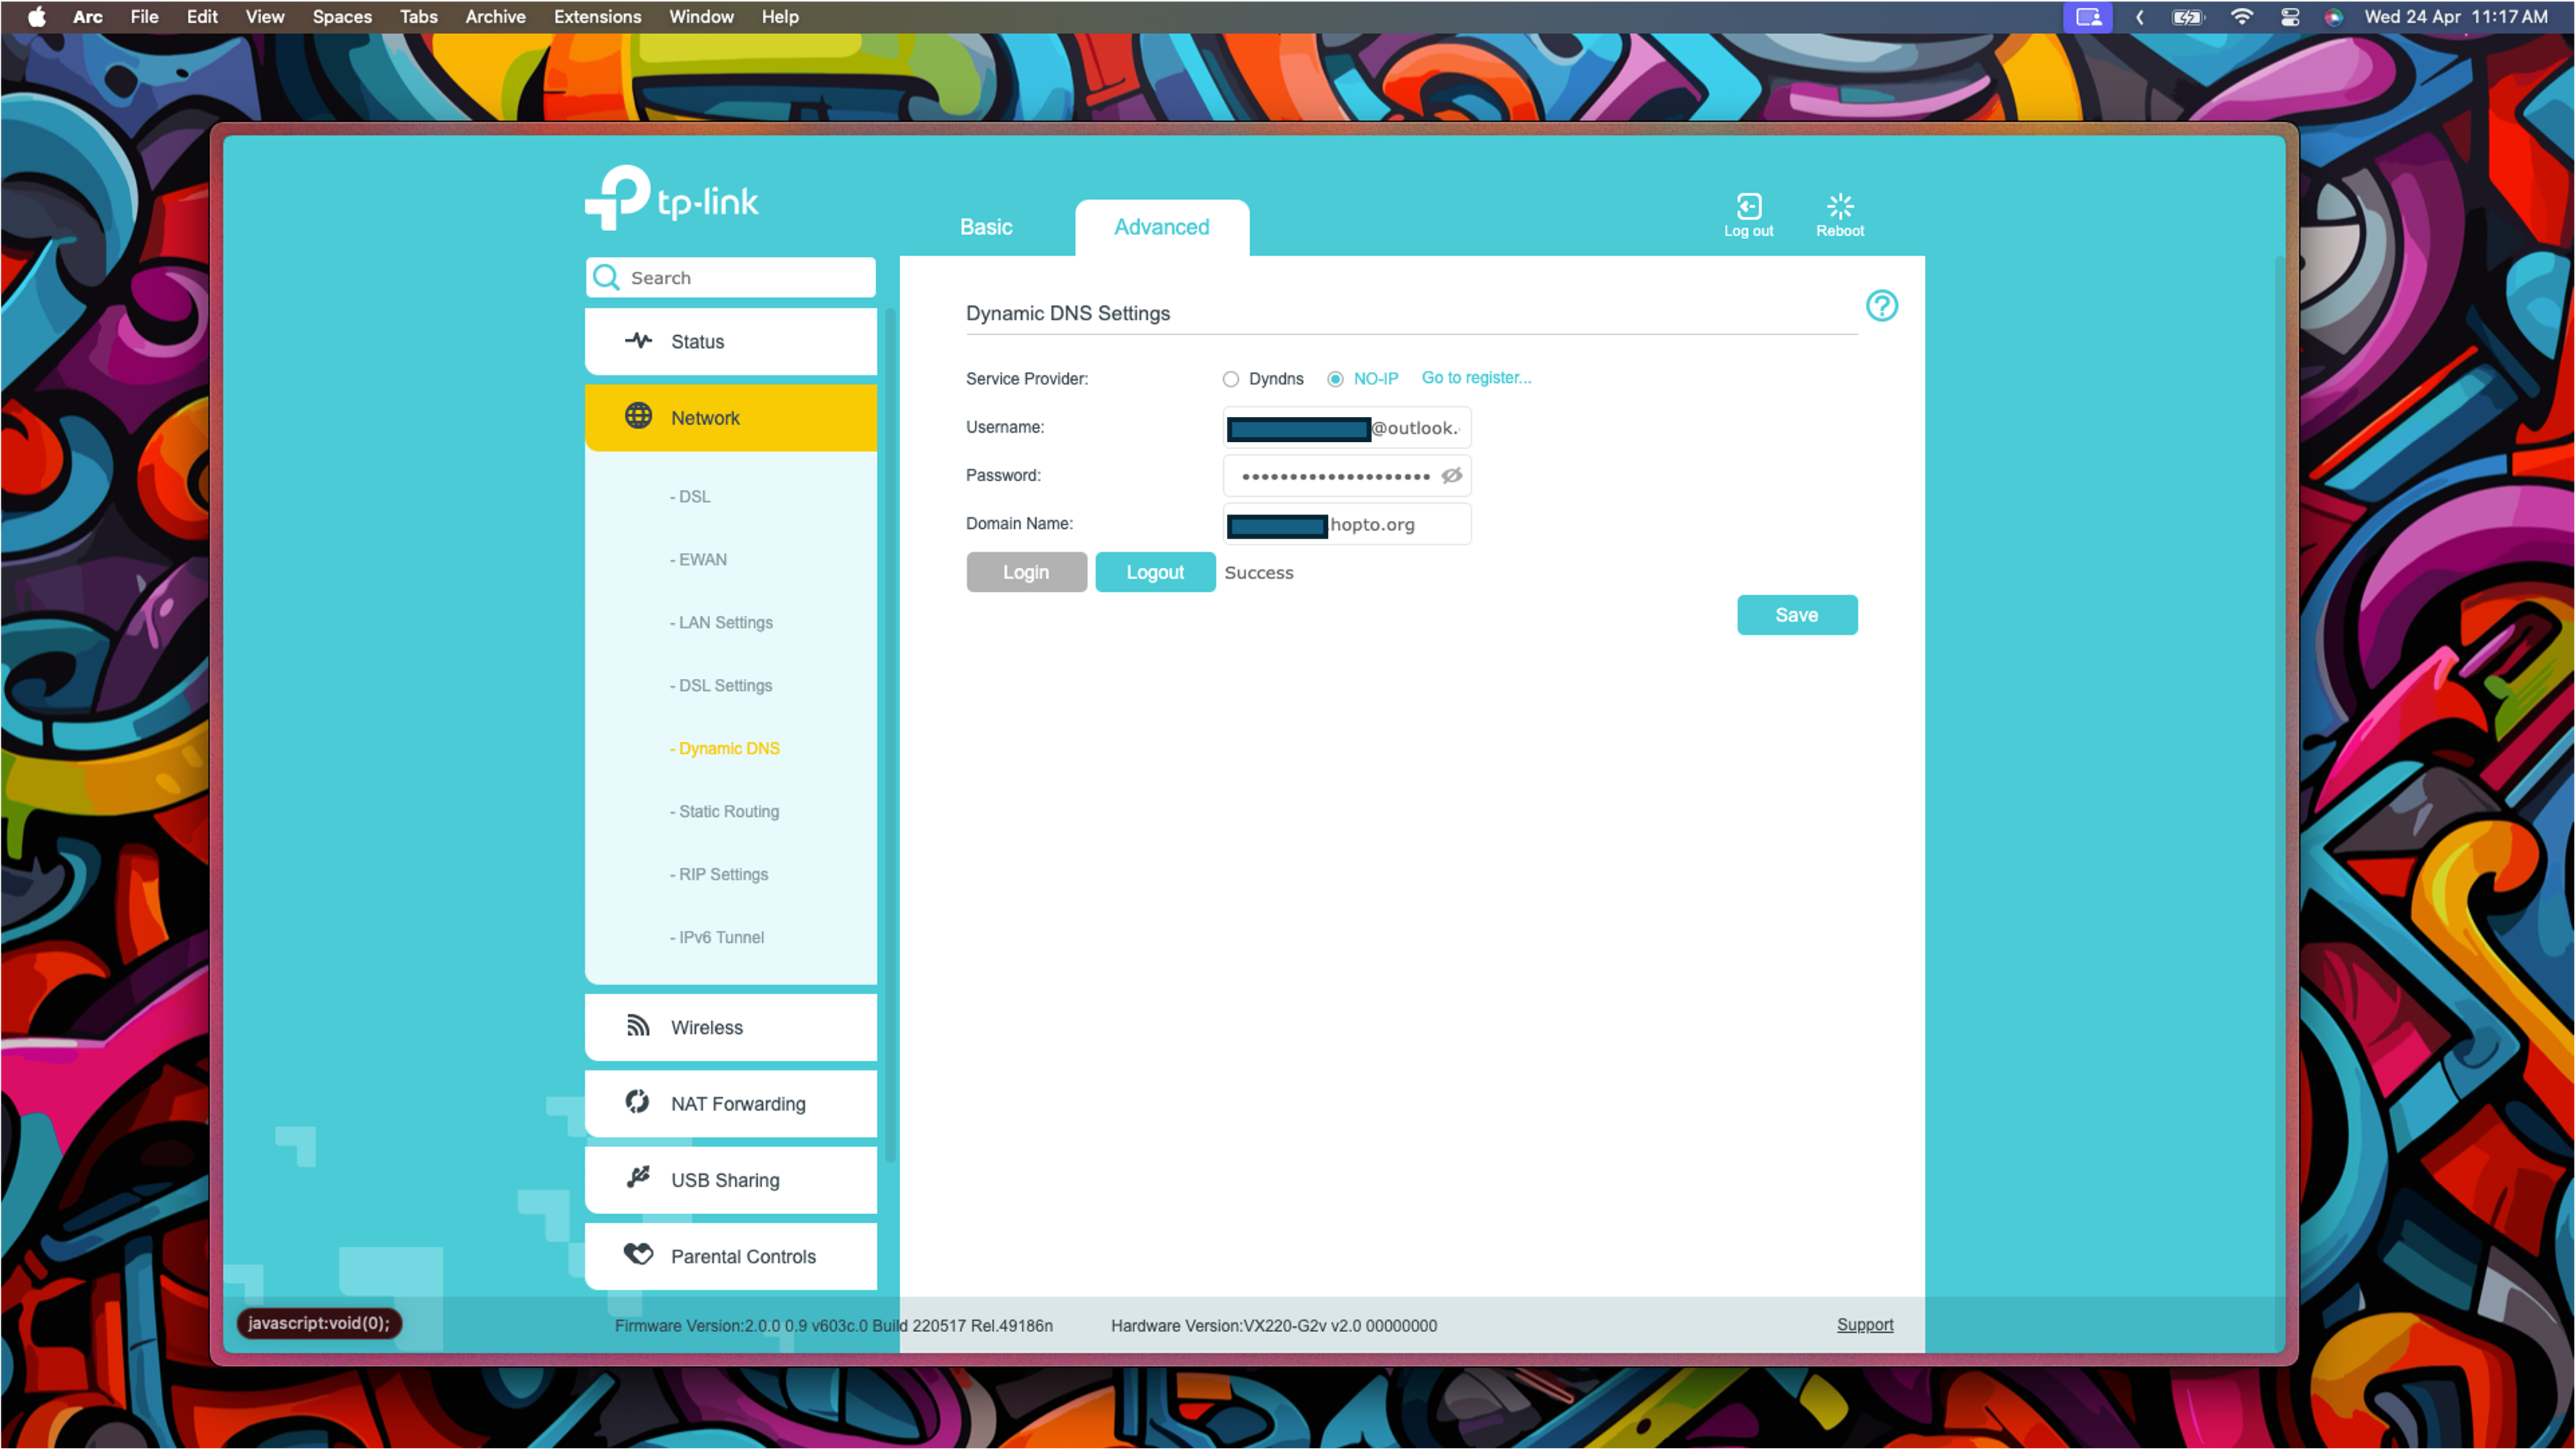
<p>Now, click the “Network” tab and select “Dynamic DNS” in the dropdown menu. You’ll want to set up a dynamic DNS server so that when your IP address changes, you don’t need to redo your RDP set up. Additionally, it’s much easier to remember a web URL than an IP address. You can get one of these for free from a Dynamic DNS service provider, such as <a href="https://www.noip.com/">No-IP</a>. From this menu, you can click <code class="language-plaintext highlighter-rouge">Go to register</code> to get there as well.</p>
<p style="text-align: center;"><img src="/images/2024-04-24/2.4.png" alt="Screenshot of TP-Link Dynamic DNS Configuration Menu" /></p>

<p>In your Dynamic DNS Service Provider (No-IP), from your dashboard, select Dynamic DNS and “No-IP Hostnames” from the dropdown menu.</p>
<p style="text-align: center;"><img src="/images/2024-04-24/2.4.png" alt="Screenshot of No-IP Dashboard" /></p>

<p>Select <code class="language-plaintext highlighter-rouge">Create Hostname</code> to make a new hostname. You can call it whatever you want. In the IPv4 Address section, enter in your public IP Address that we got from the main router settings menu.</p>
<p style="text-align: center;"><img src="/images/2024-04-24/2.3.png" alt="Screenshot of No-IP Hostnames Menu" /></p>

<p>Then, return to your Dynamic DNS router settings menu and log in with your username and password. Everything should be set-up now. All that’s left to do is to login and use your new RDP!</p>

<h2 id="3-connect-to-the-pc-via-microsoft-rdp">3. Connect to the PC via Microsoft RDP</h2>
<p>For this, we will be using the Microsoft RDP client which can be downloaded as an app. But you can use any remote desktop client that you wish.</p>

<h3 id="31-create-a-new-remote-connection">3.1. Create a new remote connection</h3>
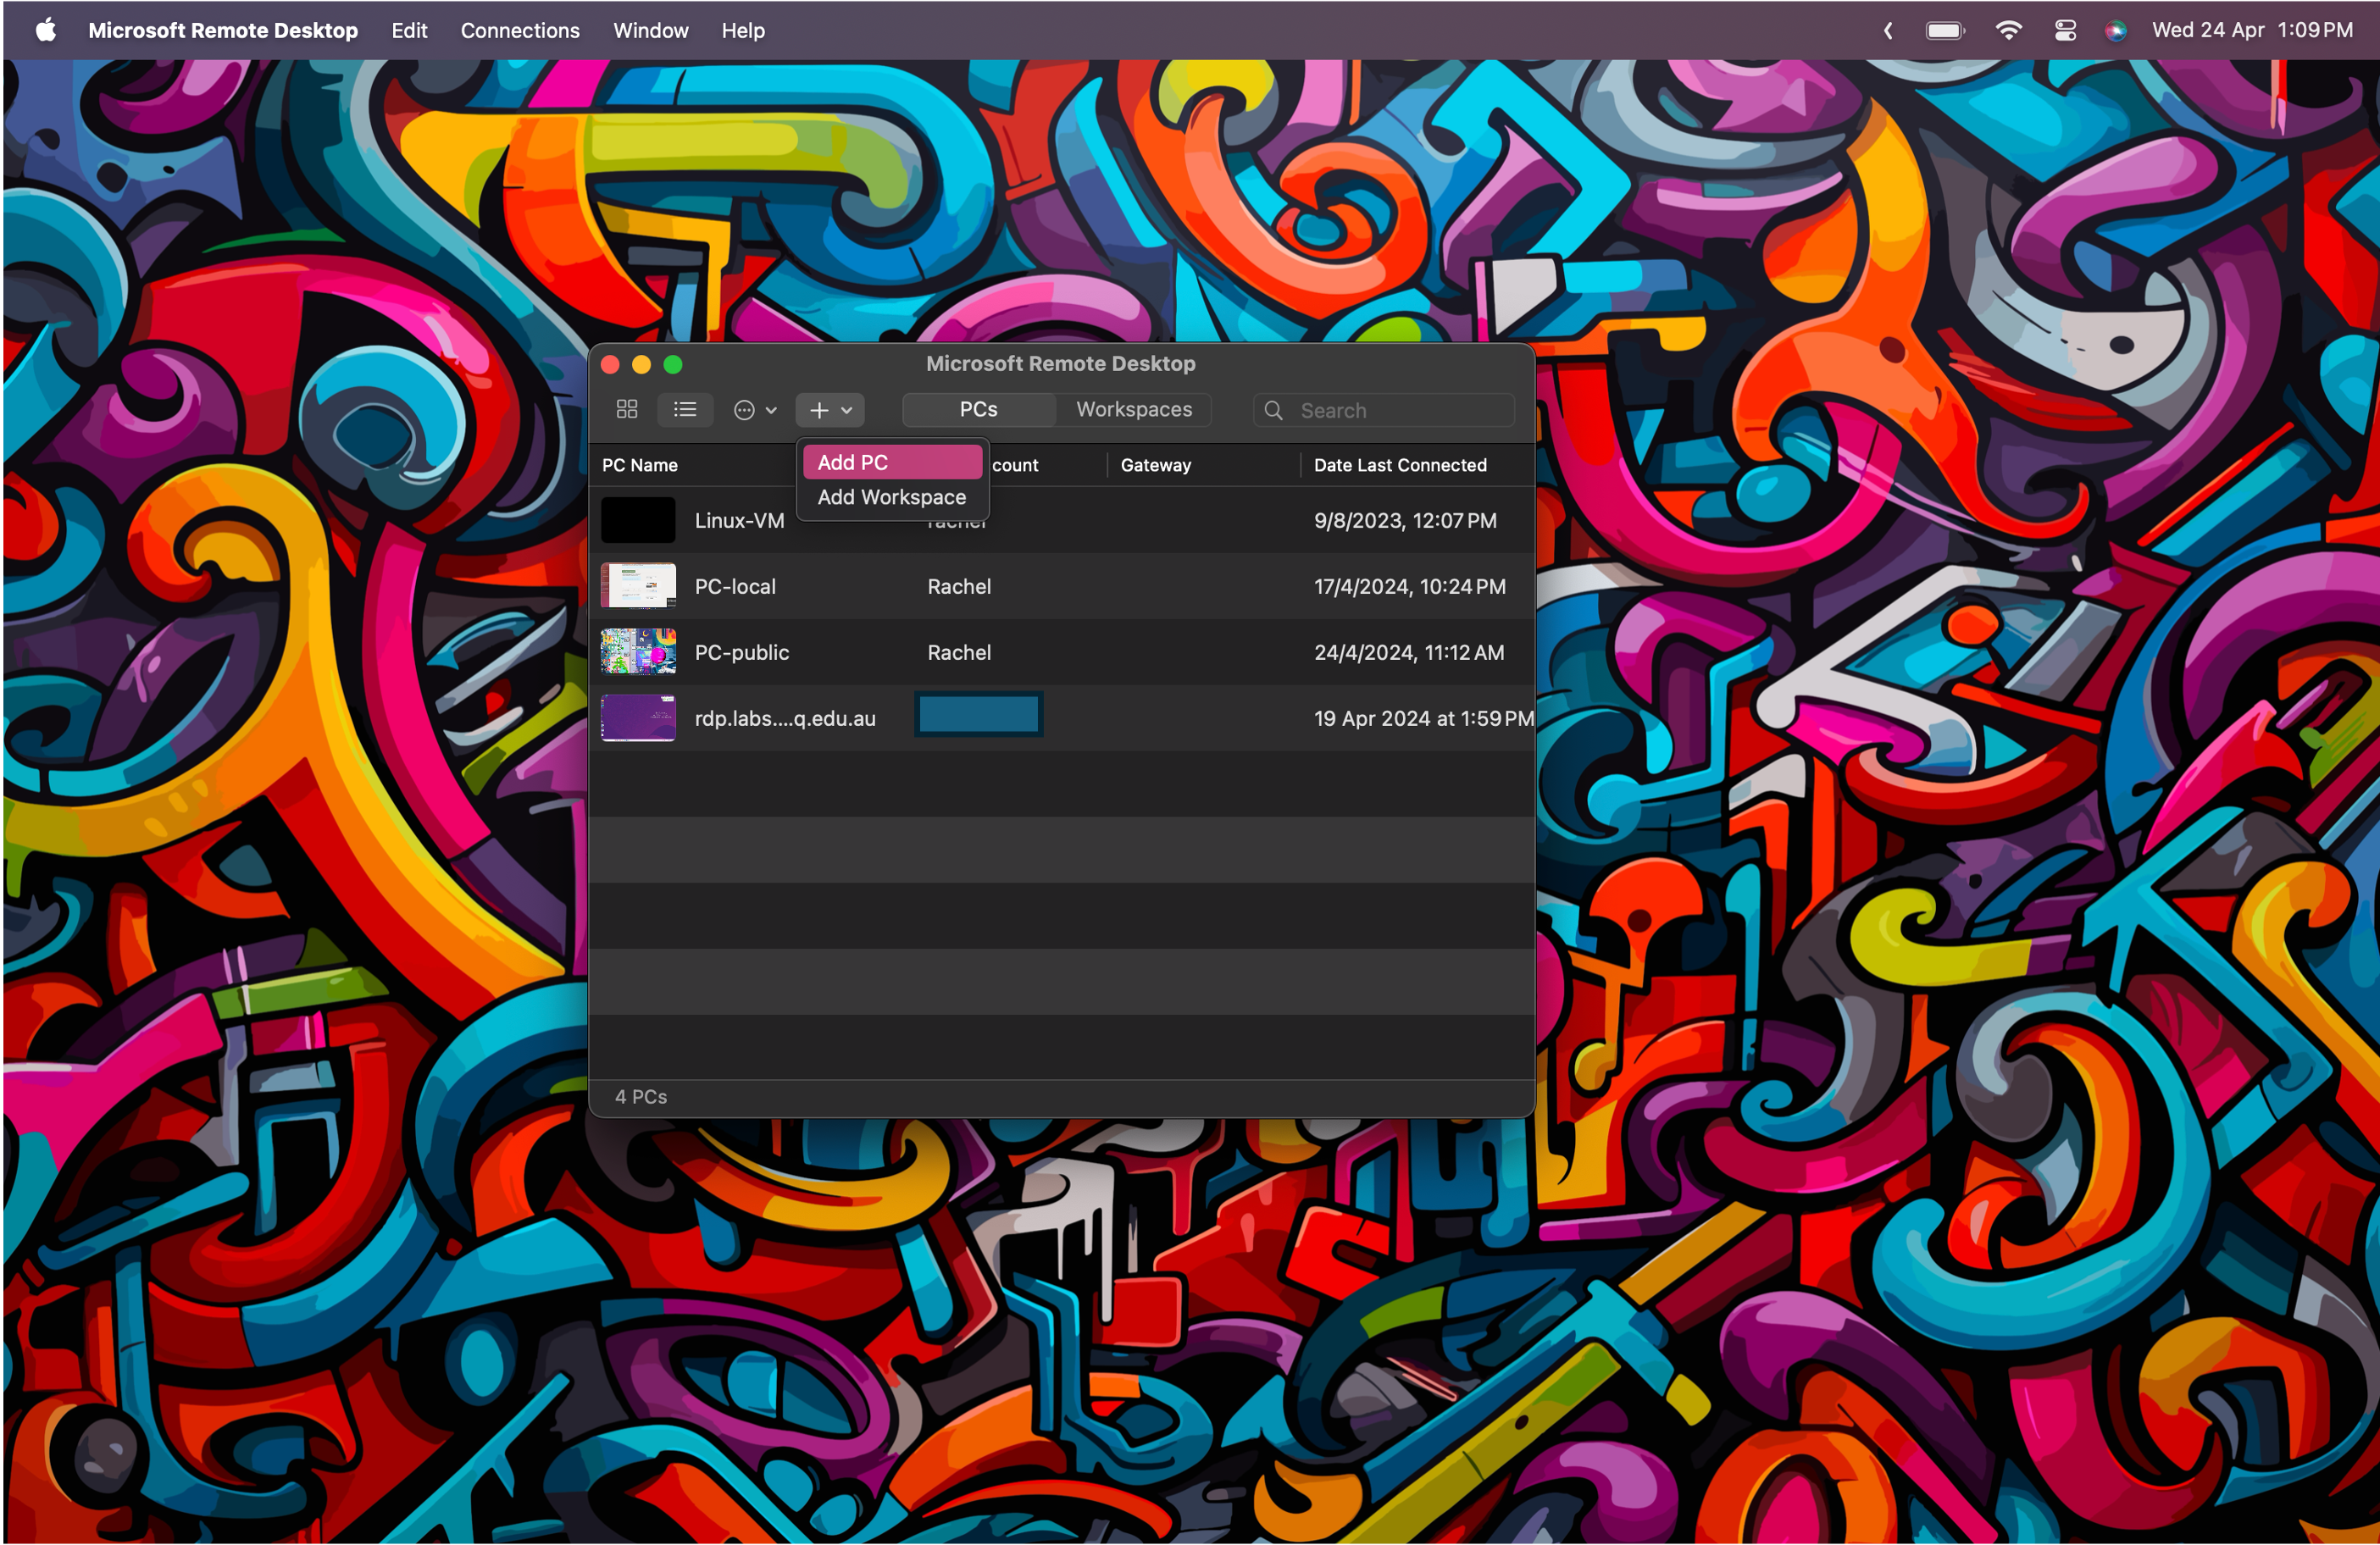
<p>Open the Microsoft Remote Desktop App on the device you wish to connect to the PC with. Then, Click the <code class="language-plaintext highlighter-rouge">+</code> Icon at the top and select “Add PC”. We’re going to save the connection the RDP in here so that you don’t need to re-enter credentials each time you use it.</p>
<p style="text-align: center;"><img src="/images/2024-04-24/3.1.png" alt="Screenshot of Microsoft Remote Desktop app" /></p>

<h3 id="32-save-user-account-details">3.2. Save user account details</h3>
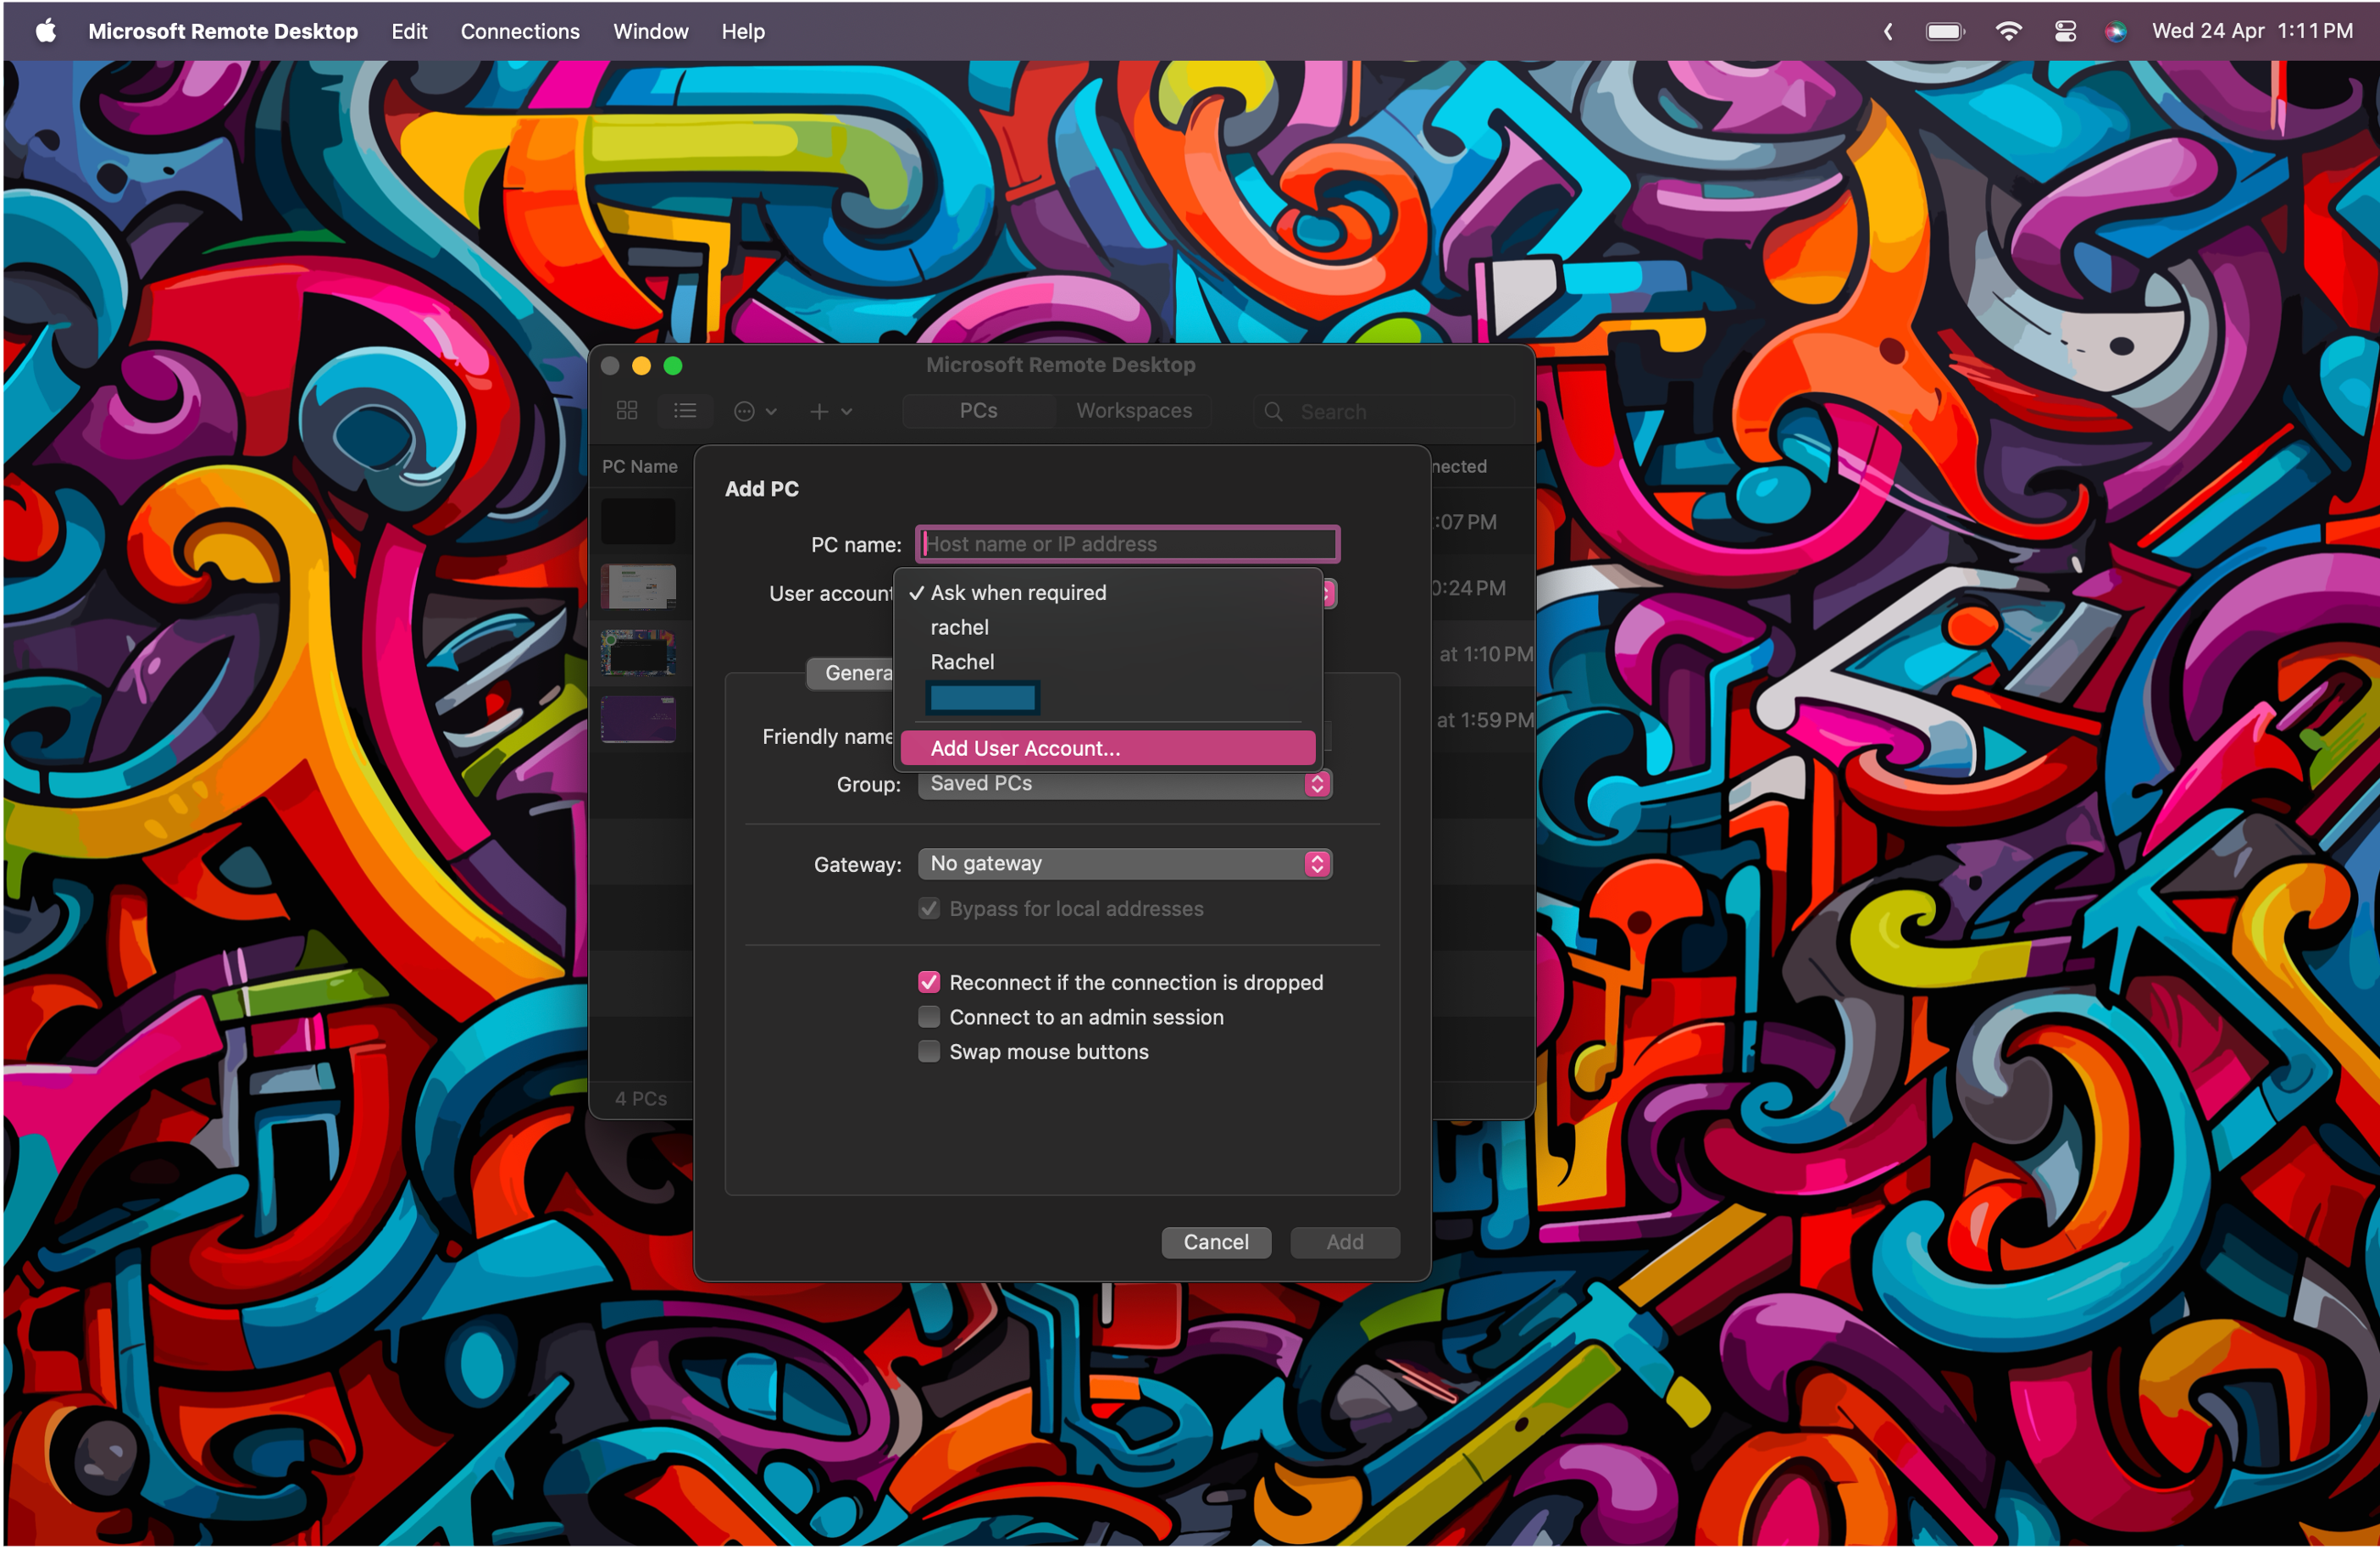
<p>In the “Add PC” pop-up window, Select the dropdown for User Account (Default value is “Ask when required”) adn select “Add User Account”.</p>
<p style="text-align: center;"><img src="/images/2024-04-24/3.3.png" alt="Screenshot of Microsoft Remote Desktop Add PC menu to Add User Account" /></p>

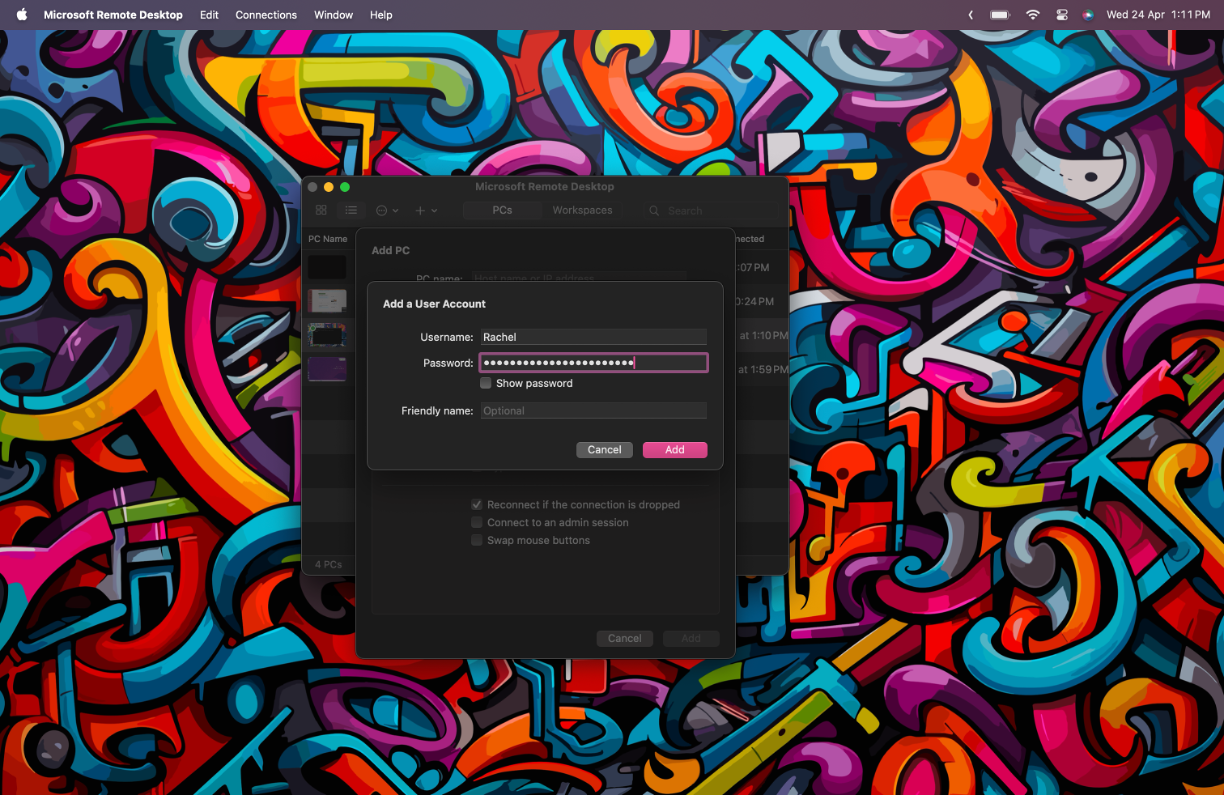
<p>This will open up the Add User Account settings, where you put in your Username and PC password (of your remote desktop).</p>

<p style="text-align: center;"><img src="/images/2024-04-24/3.4.png" alt="Screenshot of Microsoft Remote Desktop Add PC menu to Add User Account" /></p>

<p>If you’re unsure about what your PC username is, you can check this by opening a terminal window on your PC. It should default to:</p>
<div class="language-shell highlighter-rouge"><div class="highlight"><pre class="highlight"><code>C:<span class="se">\U</span>sers<span class="se">\[</span>YOUR_USERNAME]&gt;
</code></pre></div></div>
<p>The <code class="language-plaintext highlighter-rouge">[YOUR_USERNAME]</code> is the User to enter in. The password is just your PC password (or Microsoft account password if you’re logging in using that method). It is not your pin number or any other type of passkey.</p>

<h3 id="33-save-the-pc-name-details">3.3. Save the PC name details</h3>
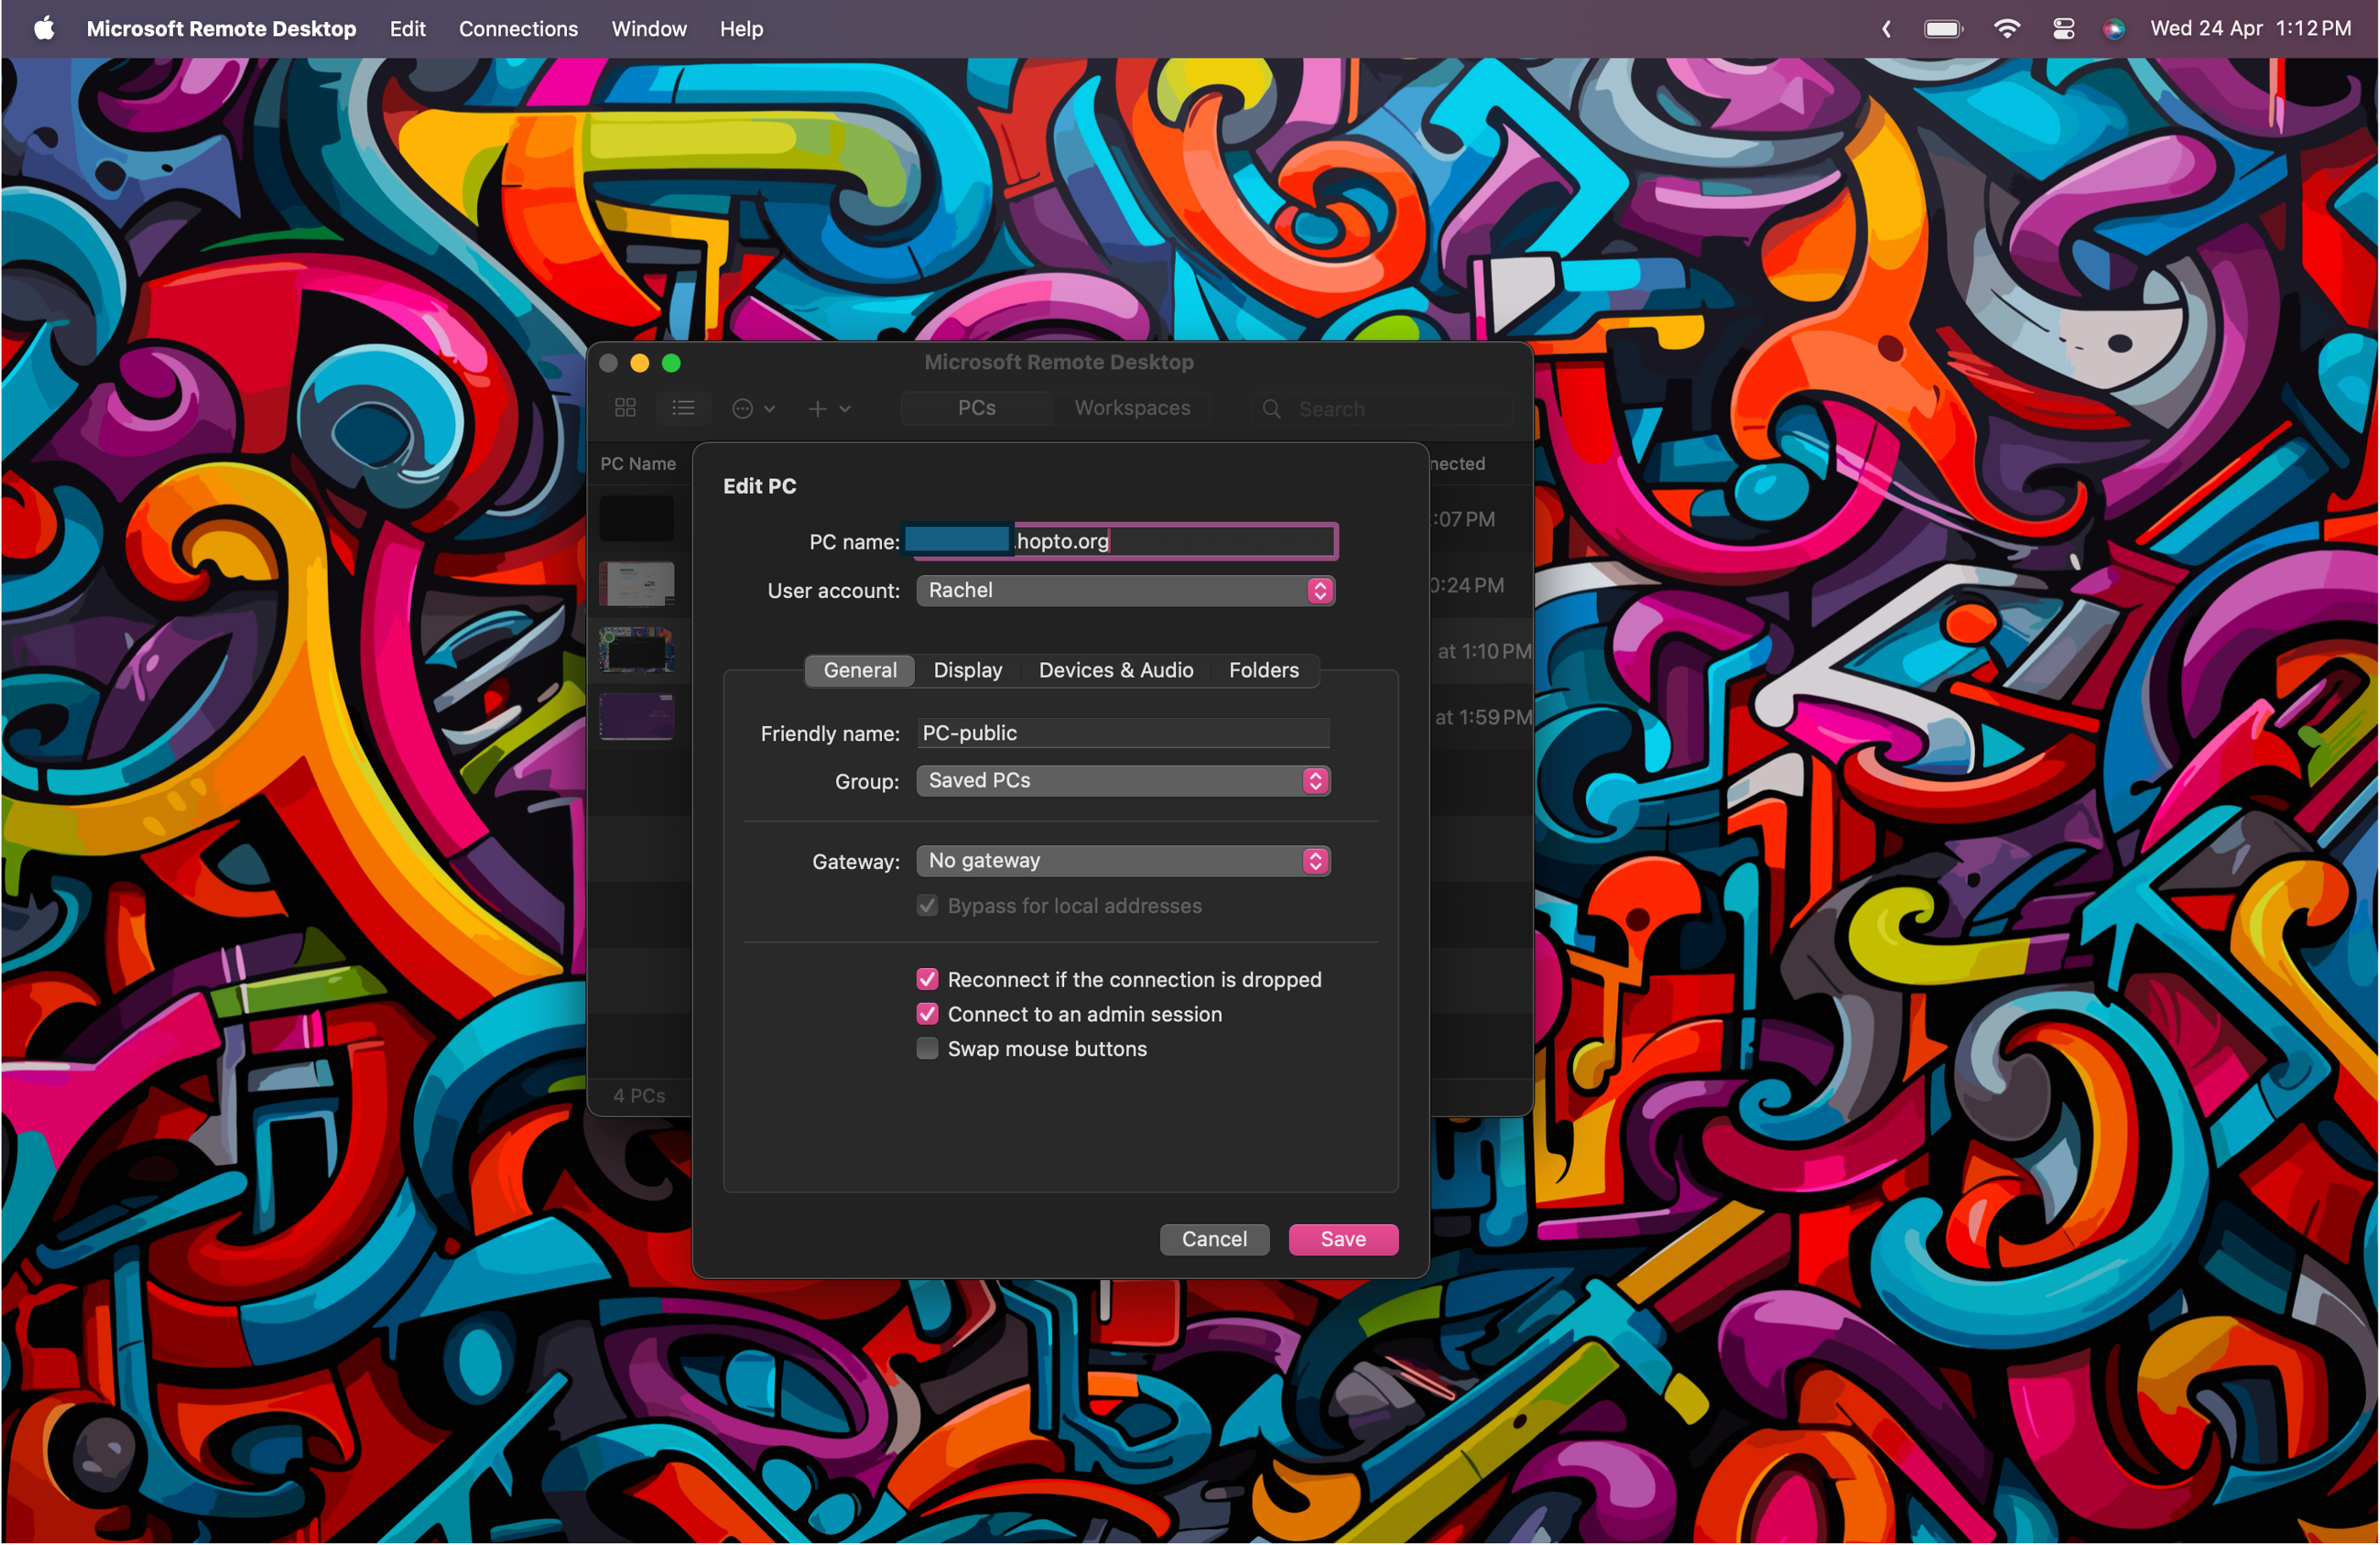
<p>Once you’ve set up your user account, select the User from teh dropdown menu and put in your dynamic DNS URL in the “PC Name” field. You can then configure these settings in anyway you wish. I recommend giving your PC a “Friendly name” which is displayed in the Microsoft Remote Desktop menu and turning on “reconnect if the connection is dropped” and “Connect as an admin session”.</p>

<p style="text-align: center;"><img src="/images/2024-04-24/3.5.png" alt="Screenshot of Microsoft Remote Desktop Add PC menu to Add User Account" /></p>

<p>In these settings, you can also change things like what periperhals you’d like to share and also enable file sharing between your devices. You can play around with these settings to suit your needs. Just make sure you save these settings!</p>

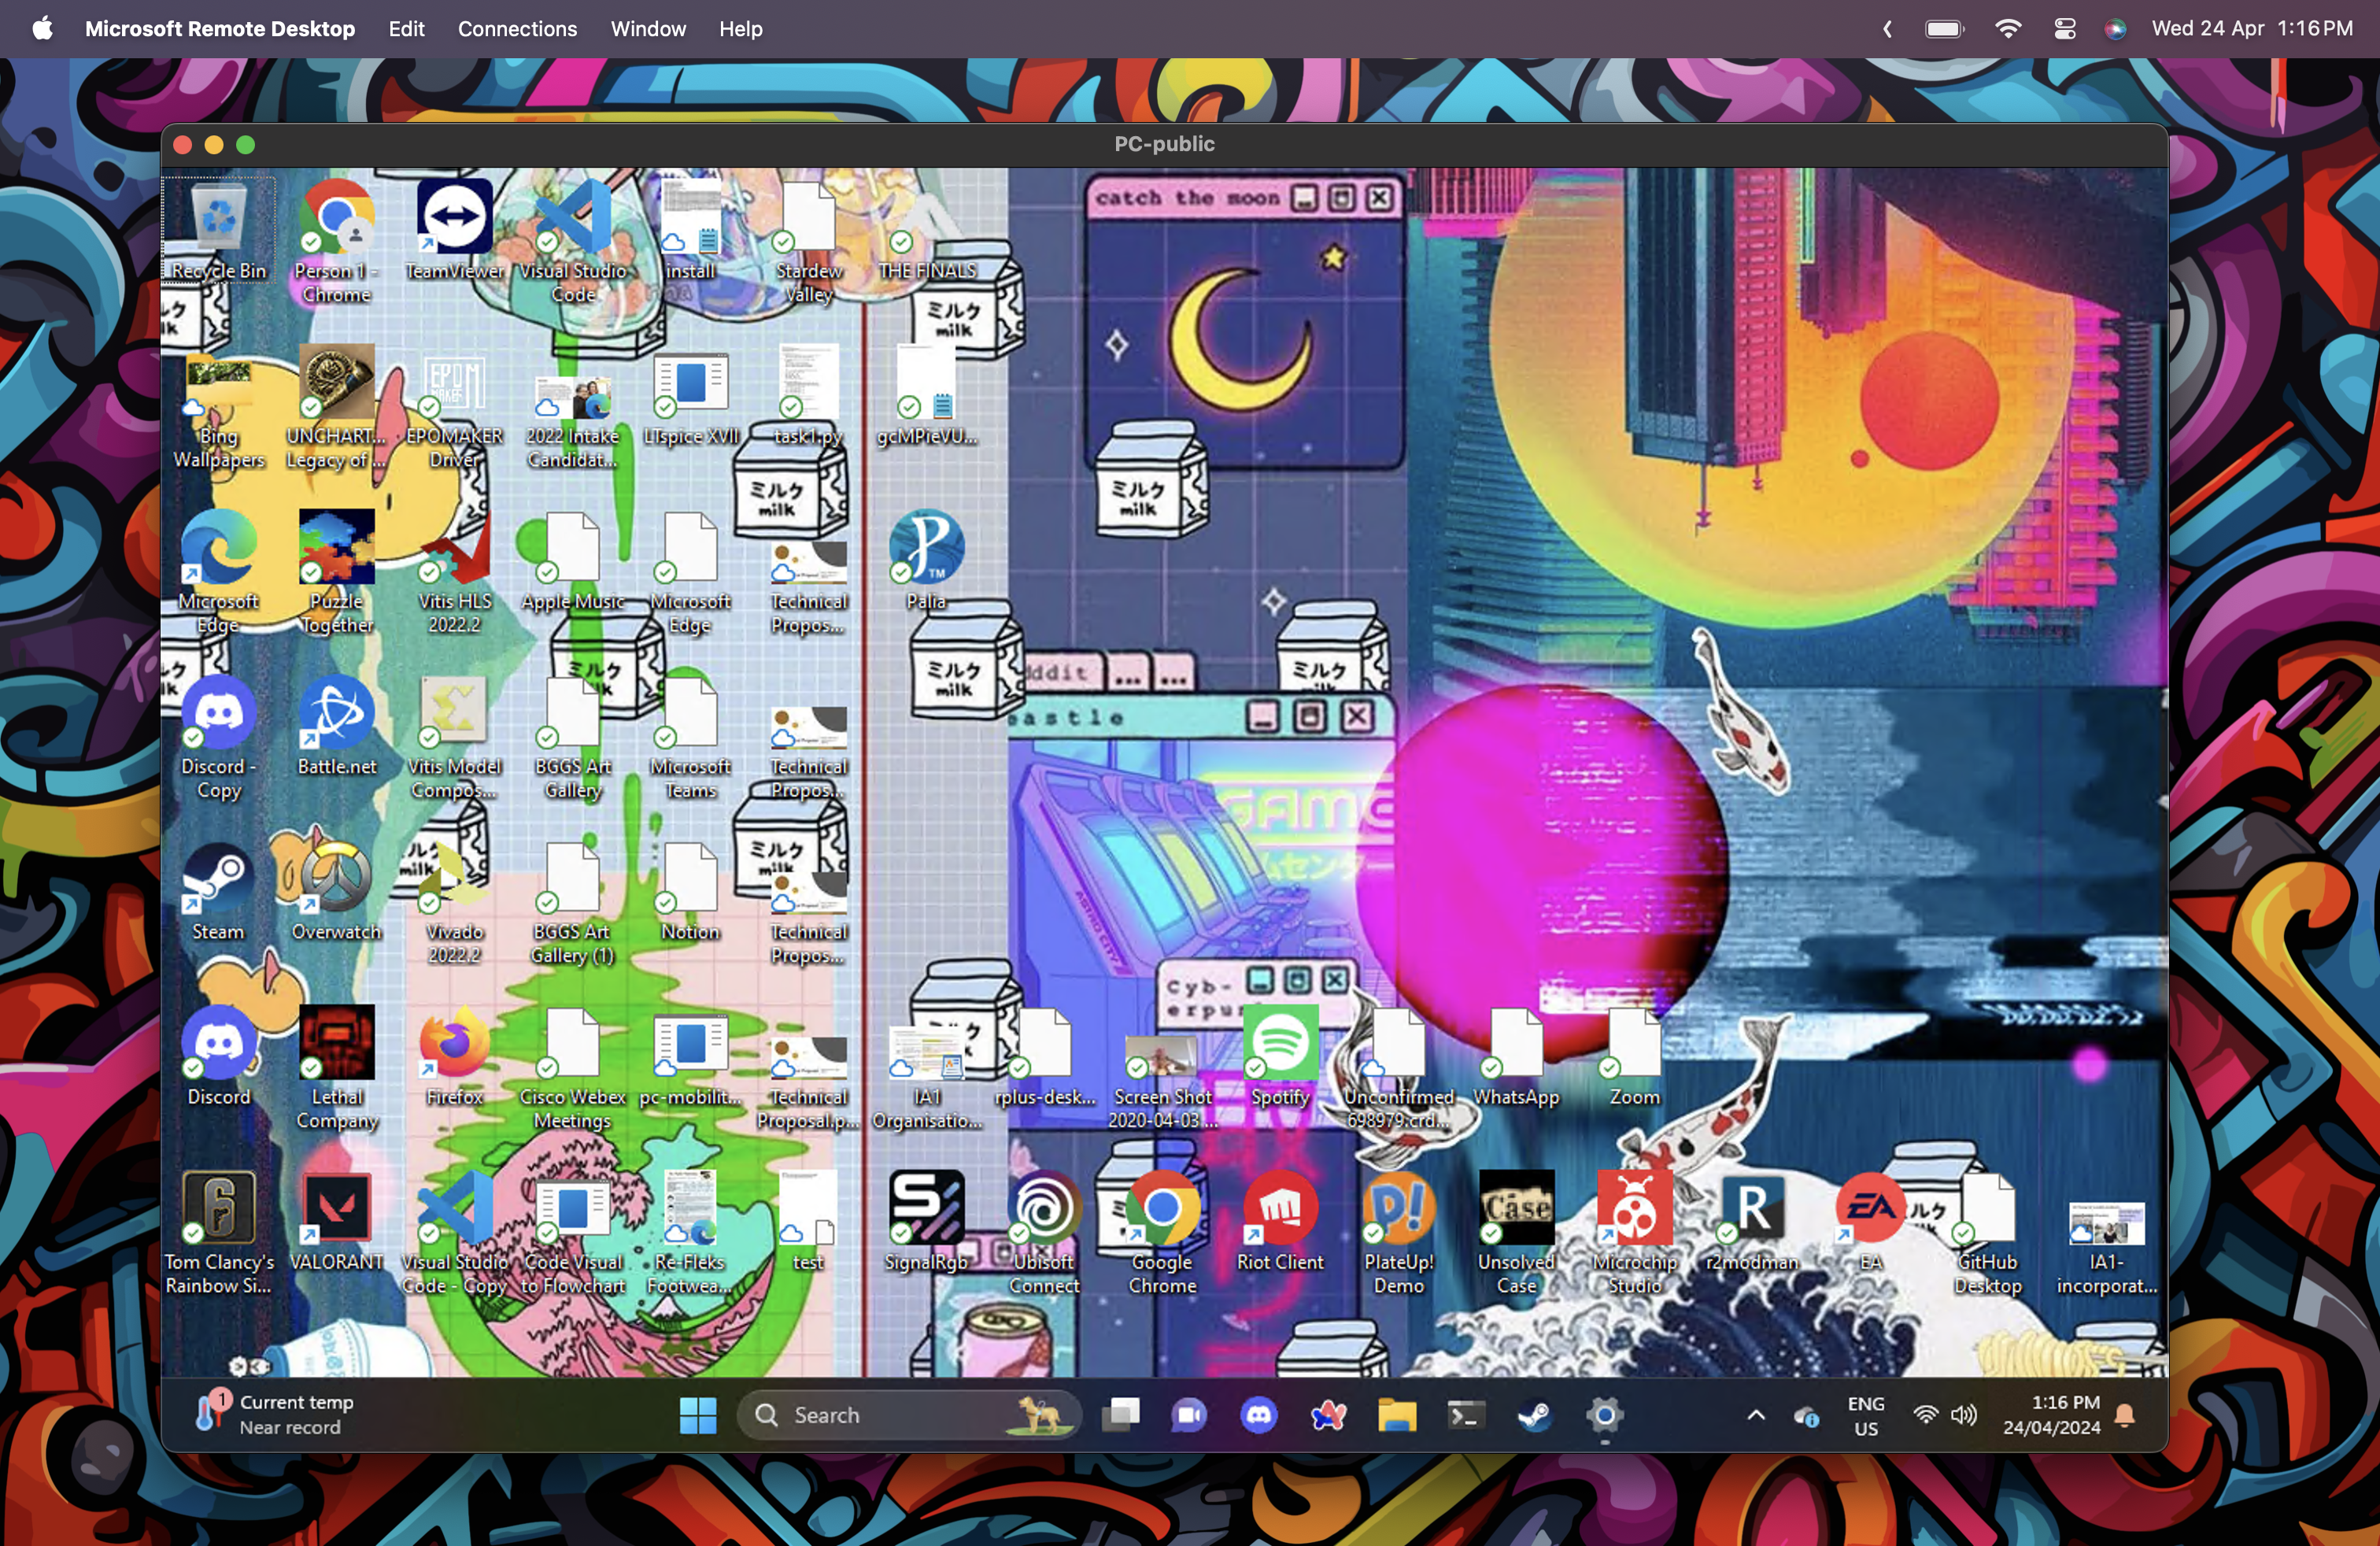
<p>Now all that’s left to do is to launch your new remote desktop connection. You can do that by double clicking on the PC in the menu and accepting the certificate for connecting.</p>

<p>And voila! You should be connected now, and you can do this from any network. Just make sure that your PC is on and connected to the internet as well.</p>
<p style="text-align: center;"><img src="/images/2024-04-24/complete.png" alt="Screenshot of Remote desktop on Mac" /></p>]]></content><author><name>Rachel</name></author><summary type="html"><![CDATA[At university, many courses require specific software or setups that can only run on a Windows machine, or require specific components, like an NVIDIA GPU. As an avid Mac user, this can be quite frustrating as a mac, particularly a silicon mac, cannot be used locally. While most courses do provide computer lab access or RDP access, often these lab computers come with a lot of restrictions, and there isn’t a guaranteed chance that the computer you’re using will be the same each time you log in. To work around this, I’ve previously set up an RDP client for my PC at home, which runs Windows and has an NVIDIA GPU (albeit, not a fantastic one) so that I can still be productive whilst at university, without needing to enter the physical lab.]]></summary><media:thumbnail xmlns:media="http://search.yahoo.com/mrss/" url="http://rachelchiong.com/images/2024-04-24/complete.png" /><media:content medium="image" url="http://rachelchiong.com/images/2024-04-24/complete.png" xmlns:media="http://search.yahoo.com/mrss/" /></entry><entry><title type="html">Jekyll and Hide: How to work on your fastAI blog locally before deploying</title><link href="http://rachelchiong.com/2024/04/20/jekyll.html" rel="alternate" type="text/html" title="Jekyll and Hide: How to work on your fastAI blog locally before deploying" /><published>2024-04-20T00:00:00+00:00</published><updated>2024-04-20T00:00:00+00:00</updated><id>http://rachelchiong.com/2024/04/20/jekyll</id><content type="html" xml:base="http://rachelchiong.com/2024/04/20/jekyll.html"><![CDATA[<p>To create this blog, I’ve been following <a href="https://www.fast.ai/posts/2020-01-16-fast_template.html">this fast AI blog post</a>,
which has been great for setting up and deployment. This blog post focuses on the simplicity
of updating a blog and intentionally hides the Jekyll that’s under the hood.
However, sometimes you want to see your changes immediately in a testing environment
instead of having to wait for github to build and render your webpage.</p>

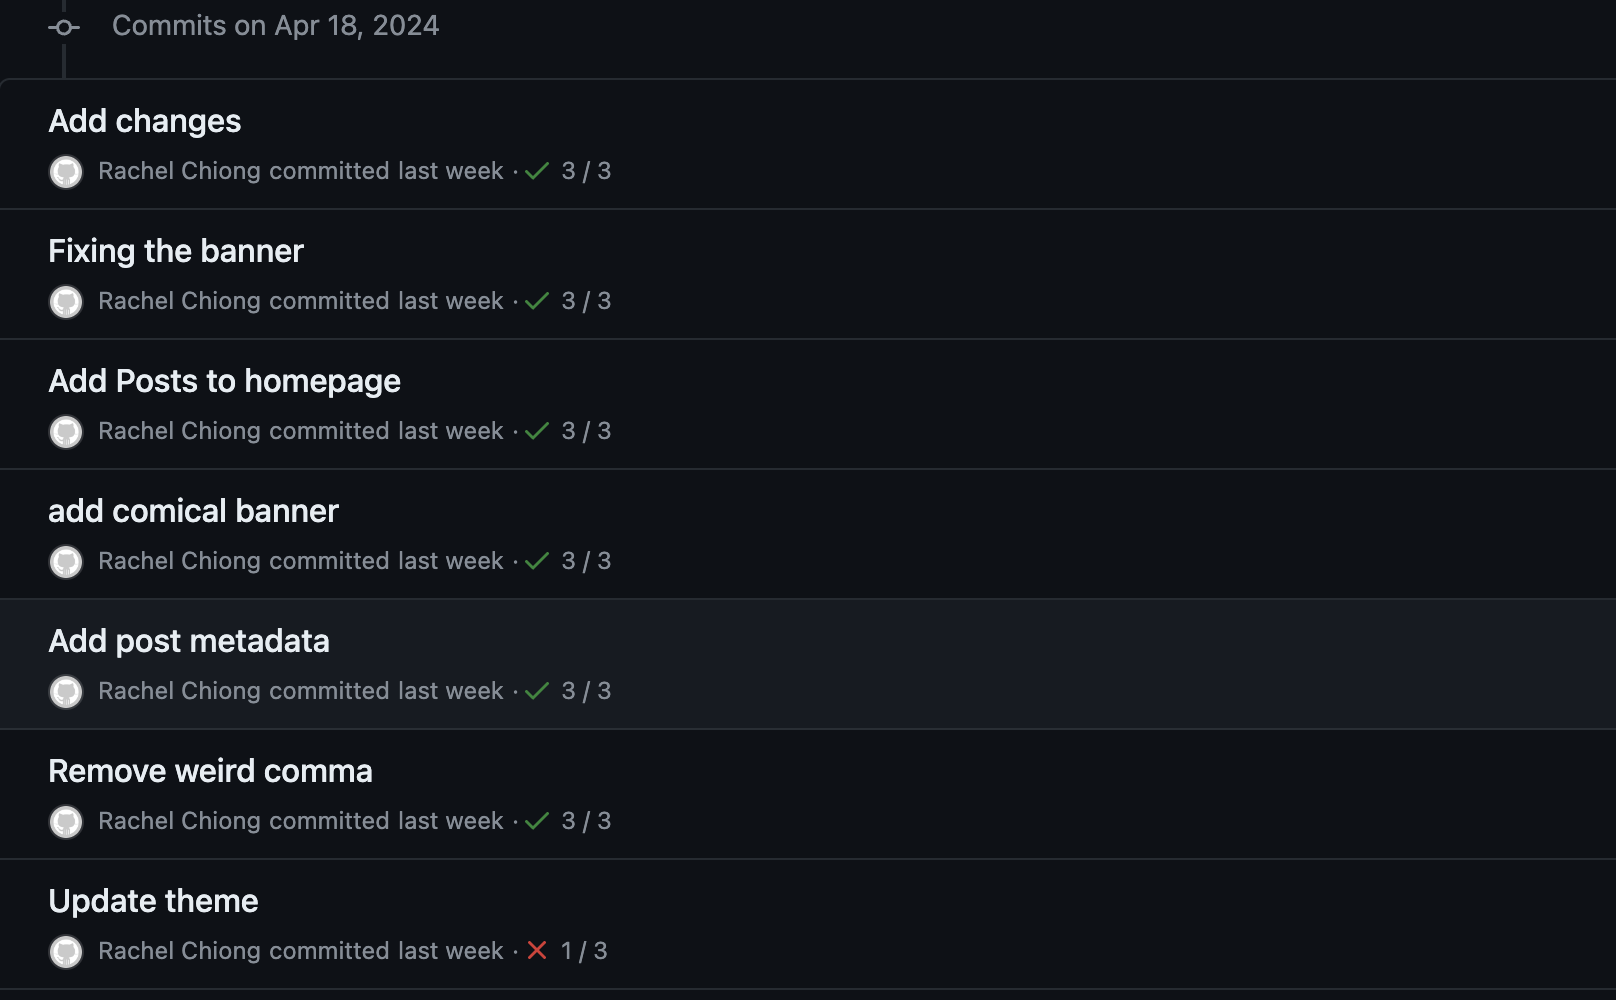
<p>Otherwise, you’ll end up with a commit history similar to this:</p>
<p style="text-align: center; width=60%;"><img src="/images/2024-04-20/commit-history.png" alt="Commit History Image" width="50%" /></p>

<p>In other words, you may want to “hide” your testing and changes before deployment.</p>

<h2 id="0-follow-the-fast-ai-blog-post-to-set-up-your-blog">0. Follow the fast AI blog post to set up your blog</h2>
<p>You can view the blog post <a href="https://www.fast.ai/posts/2020-01-16-fast_template.html">here</a>.</p>

<h2 id="1-install-the-jekyll-bundler">1. Install the Jekyll bundler</h2>
<p>Get into your blog repo and install jekyll (you’ll need to have ruby installed first).</p>
<div class="language-bash highlighter-rouge"><div class="highlight"><pre class="highlight"><code>bundle <span class="nb">install</span>
</code></pre></div></div>

<p>You will then see a <code class="language-plaintext highlighter-rouge">Gemfile</code> in the directory.</p>

<h2 id="2-create-a-drafts-folder">2. Create a Drafts Folder</h2>
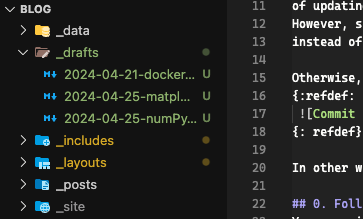
<p>Create a folder called <code class="language-plaintext highlighter-rouge">_drafts</code> at the same level as the <code class="language-plaintext highlighter-rouge">_posts</code> folder.
Here, you can add your drafts, written and formatted just like how you would
write a post. This provides a good storage space to put work-in-progress blog posts
which can be committed to your repo without publishing.</p>

<p style="text-align: center; width=60%;"><img src="/images/2024-04-20/drafts-folder.png" alt="Drafts folder" width="50%" /></p>

<h2 id="3-run-the-test-server">3. Run the test server</h2>
<p>Now that the Gemfile exists and you have a draft ready to go, you can run it
locally as a test server by using:</p>
<div class="language-bash highlighter-rouge"><div class="highlight"><pre class="highlight"><code>bundle <span class="nb">exec </span>jekyll serve <span class="nt">--drafts</span>
</code></pre></div></div>

<p>Then, to view your blog, in your web-browser access:</p>
<div class="language-plaintext highlighter-rouge"><div class="highlight"><pre class="highlight"><code>http://127.0.0.1:4000
</code></pre></div></div>
<p>Everytime save a change to your blog, you can reload the test server webpage and your
changes should be able to be synced immediately.</p>

<p>When you’re happy with your post, you can just move it from the <code class="language-plaintext highlighter-rouge">_drafts</code> folder
to the <code class="language-plaintext highlighter-rouge">_posts</code> folder and publish like you normally would.</p>]]></content><author><name>Rachel</name></author><summary type="html"><![CDATA[To create this blog, I’ve been following this fast AI blog post, which has been great for setting up and deployment. This blog post focuses on the simplicity of updating a blog and intentionally hides the Jekyll that’s under the hood. However, sometimes you want to see your changes immediately in a testing environment instead of having to wait for github to build and render your webpage.]]></summary><media:thumbnail xmlns:media="http://search.yahoo.com/mrss/" url="http://rachelchiong.com/images/2024-04-20/drafts-folder.png" /><media:content medium="image" url="http://rachelchiong.com/images/2024-04-20/drafts-folder.png" xmlns:media="http://search.yahoo.com/mrss/" /></entry><entry><title type="html">Setting up submodules in your repo</title><link href="http://rachelchiong.com/2024/04/18/submodules.html" rel="alternate" type="text/html" title="Setting up submodules in your repo" /><published>2024-04-18T00:00:00+00:00</published><updated>2024-04-18T00:00:00+00:00</updated><id>http://rachelchiong.com/2024/04/18/submodules</id><content type="html" xml:base="http://rachelchiong.com/2024/04/18/submodules.html"><![CDATA[<p>Sometimes, when working cross-project or with code that’s been cloned from
elsewhere, it helps to add them as a submodule to a main repo. For example,
for assignment 2 I need to write a blog (this one!), generate a fingerprint
identifier GUI and train image classification models
on a CPU and GPU, all of which are in different repos upon set up.</p>

<p>Without submoduling, each time I log in to a remote desktop session to
remote lab computers, I’d need to clone each of these repos individually
which is a lot more effort than it’s worth.</p>

<p><img src="/images/submodules-img.png" alt="Submodules on Github" /></p>

<ol id="markdown-toc">
  <li><a href="#steps-to-add-a-submodule-repo" id="markdown-toc-steps-to-add-a-submodule-repo">Steps to add a submodule repo</a>    <ol>
      <li><a href="#1-clone-your-main-repo" id="markdown-toc-1-clone-your-main-repo">1. Clone your main repo</a></li>
      <li><a href="#2-clone-in-your-sub-module-repos" id="markdown-toc-2-clone-in-your-sub-module-repos">2. Clone in your sub-module repo/s</a></li>
      <li><a href="#3-add-your-repo-to-git" id="markdown-toc-3-add-your-repo-to-git">3. Add your repo to git</a></li>
    </ol>
  </li>
  <li><a href="#clone-your-repo-with-submodules" id="markdown-toc-clone-your-repo-with-submodules">Clone your repo with submodules</a></li>
  <li><a href="#troubleshooting-and-warnings" id="markdown-toc-troubleshooting-and-warnings">Troubleshooting and Warnings</a>    <ol>
      <li><a href="#removing-a-submodule" id="markdown-toc-removing-a-submodule">Removing a submodule</a></li>
    </ol>
  </li>
</ol>

<h2 id="steps-to-add-a-submodule-repo">Steps to add a submodule repo</h2>
<h3 id="1-clone-your-main-repo">1. Clone your main repo</h3>
<div class="language-sh highlighter-rouge"><div class="highlight"><pre class="highlight"><code>git clone &lt;YOUR_MAIN_REPO&gt;
</code></pre></div></div>

<h3 id="2-clone-in-your-sub-module-repos">2. Clone in your sub-module repo/s</h3>
<p>Just clone in your submodules like normal here. The magic is in the next step.</p>

<div class="language-sh highlighter-rouge"><div class="highlight"><pre class="highlight"><code><span class="nb">cd</span> &lt;YOUR_MAIN_REPO&gt;
git clone &lt;YOUR_SUBMODULE_REPO&gt; &lt;SUBMODULE_REPO_NAME&gt;
</code></pre></div></div>

<h3 id="3-add-your-repo-to-git">3. Add your repo to git</h3>
<pre><code class="language-git">git submodule add &lt;YOUR_SUBMODULE_REPO_LINK&gt; &lt;SUBMODULE_REPO_NAME&gt;
</code></pre>
<p>If successful, you should get a message saying that it has been successfully added.</p>

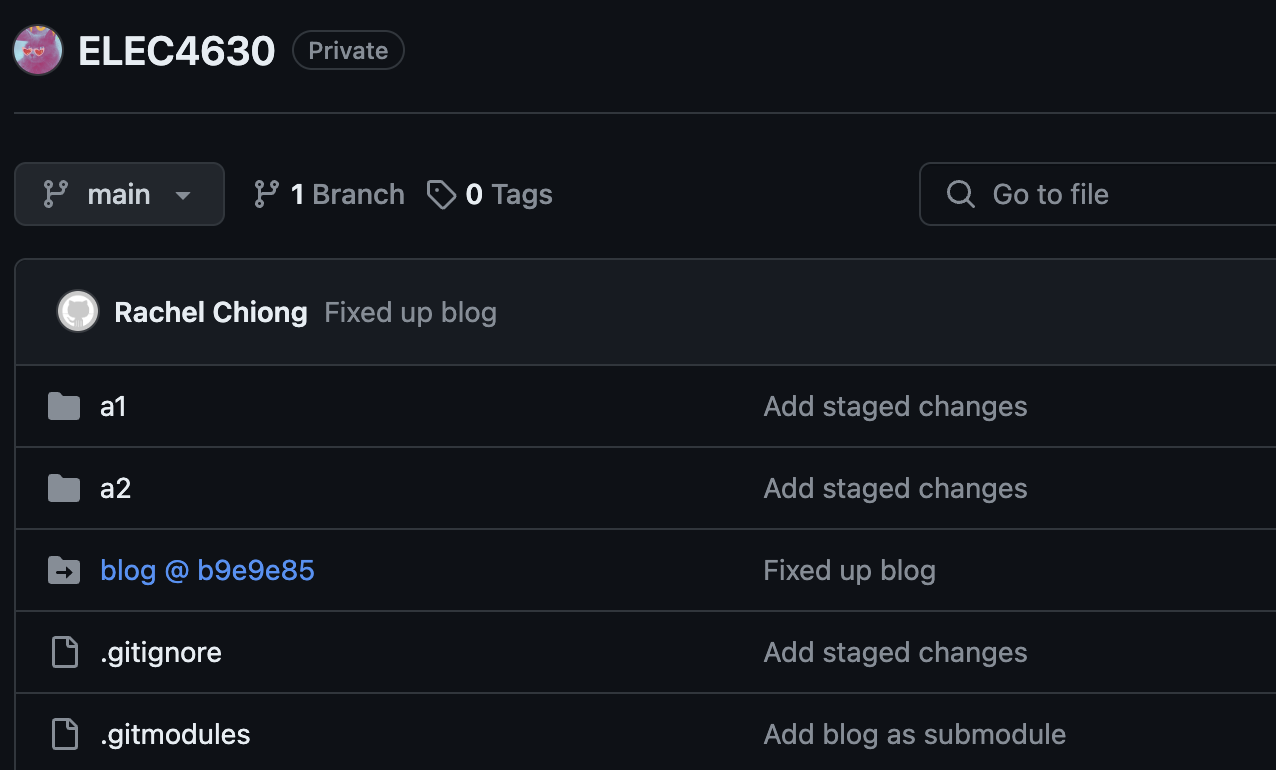
<p>And voila! You should be able to verify that a submodule has been added on github.</p>

<h2 id="clone-your-repo-with-submodules">Clone your repo with submodules</h2>
<p>Now, when you’re cloning the main repo to a new destination, you’ll need to add
the <code class="language-plaintext highlighter-rouge">recurse-submodules</code> flag. This ensures that the contents of the submodules
will also be cloned in. They will also retain the branch/commit number you’re using
for the submodule as well (if it happens to be different).</p>

<pre><code class="language-git">git clone --recurse-submodules &lt;YOUR_REPO_PATH&gt;
</code></pre>

<h2 id="troubleshooting-and-warnings">Troubleshooting and Warnings</h2>
<p>Submodules can be very tricky and cause grief if not used properly. A couple good rules
of thumb to follow are:</p>
<ol>
  <li>Only make a submodule of a repo once (don’t clone it into two spots within your main repo)</li>
  <li>Only use submodules when there is some level of dependency. I’ve used submodules
just because it helps with organisation. But this can get gnarly very quicky with an
abundance of git issues.</li>
</ol>

<p>Here are some troubleshooting guides:</p>
<h3 id="removing-a-submodule">Removing a submodule</h3>
<ol>
  <li>Delete the relevant lines from the <code class="language-plaintext highlighter-rouge">.gitmodules</code> file. The lines should look
like this:
    <pre><code class="language-git">[submodule "&lt;SUBMODULE_REPO_PATH&gt;"]
 path = &lt;SUBMODULE_REPO_PATH&gt;
 url = https://github.com/&lt;SUBMODULE_REPO_URL&gt;
</code></pre>
  </li>
  <li>Remove the link via git in the command line:
    <pre><code class="language-git">git rm --cached &lt;SUBMODULE_REPO_PATH&gt;
</code></pre>
  </li>
  <li>Finally, remove the folder locally if it still exists. Then stage and commit your changes
    <pre><code class="language-git">rm -R &lt;SUBMODULE_REPO_PATH&gt;
</code></pre>
  </li>
</ol>

<p>Also, be prepared to deal with an abundance of merge conflicts and branch rebasing.
It’s definitely not for the faint of heart!</p>]]></content><author><name>Rachel</name></author><summary type="html"><![CDATA[Sometimes, when working cross-project or with code that’s been cloned from elsewhere, it helps to add them as a submodule to a main repo. For example, for assignment 2 I need to write a blog (this one!), generate a fingerprint identifier GUI and train image classification models on a CPU and GPU, all of which are in different repos upon set up.]]></summary><media:thumbnail xmlns:media="http://search.yahoo.com/mrss/" url="http://rachelchiong.com/images/submodules-img.png" /><media:content medium="image" url="http://rachelchiong.com/images/submodules-img.png" xmlns:media="http://search.yahoo.com/mrss/" /></entry><entry><title type="html">This is the title</title><link href="http://rachelchiong.com/2020/01/14/welcome.html" rel="alternate" type="text/html" title="This is the title" /><published>2020-01-14T00:00:00+00:00</published><updated>2020-01-14T00:00:00+00:00</updated><id>http://rachelchiong.com/2020/01/14/welcome</id><content type="html" xml:base="http://rachelchiong.com/2020/01/14/welcome.html"><![CDATA[<p>Here’s the table of contents:</p>

<ol id="markdown-toc">
  <li><a href="#basic-setup" id="markdown-toc-basic-setup">Basic setup</a></li>
  <li><a href="#basic-formatting" id="markdown-toc-basic-formatting">Basic formatting</a></li>
  <li><a href="#lists" id="markdown-toc-lists">Lists</a></li>
  <li><a href="#boxes-and-stuff" id="markdown-toc-boxes-and-stuff">Boxes and stuff</a></li>
  <li><a href="#images" id="markdown-toc-images">Images</a></li>
  <li><a href="#code" id="markdown-toc-code">Code</a></li>
  <li><a href="#tables" id="markdown-toc-tables">Tables</a></li>
  <li><a href="#footnotes" id="markdown-toc-footnotes">Footnotes</a></li>
</ol>

<h2 id="basic-setup">Basic setup</h2>

<p>Jekyll requires blog post files to be named according to the following format:</p>

<p><code class="language-plaintext highlighter-rouge">YEAR-MONTH-DAY-filename.md</code></p>

<p>Where <code class="language-plaintext highlighter-rouge">YEAR</code> is a four-digit number, <code class="language-plaintext highlighter-rouge">MONTH</code> and <code class="language-plaintext highlighter-rouge">DAY</code> are both two-digit numbers, and <code class="language-plaintext highlighter-rouge">filename</code> is whatever file name you choose, to remind yourself what this post is about. <code class="language-plaintext highlighter-rouge">.md</code> is the file extension for markdown files.</p>

<p>The first line of the file should start with a single hash character, then a space, then your title. This is how you create a “<em>level 1 heading</em>” in markdown. Then you can create level 2, 3, etc headings as you wish but repeating the hash character, such as you see in the line <code class="language-plaintext highlighter-rouge">## File names</code> above.</p>

<h2 id="basic-formatting">Basic formatting</h2>

<p>You can use <em>italics</em>, <strong>bold</strong>, <code class="language-plaintext highlighter-rouge">code font text</code>, and create <a href="https://www.markdownguide.org/cheat-sheet/">links</a>. Here’s a footnote <sup id="fnref:1" role="doc-noteref"><a href="#fn:1" class="footnote" rel="footnote">1</a></sup>. Here’s a horizontal rule:</p>

<hr />

<h2 id="lists">Lists</h2>

<p>Here’s a list:</p>

<ul>
  <li>item 1</li>
  <li>item 2</li>
</ul>

<p>And a numbered list:</p>

<ol>
  <li>item 1</li>
  <li>item 2</li>
</ol>

<h2 id="boxes-and-stuff">Boxes and stuff</h2>

<blockquote>
  <p>This is a quotation</p>
</blockquote>

<div class="Toast Toast--warning googoo">
   <span class="Toast-icon"><svg class="octicon octicon-alert" viewBox="0 0 16 16" version="1.1" width="16" height="16" aria-hidden="true"><path fill-rule="evenodd" d="M8.22 1.754a.25.25 0 00-.44 0L1.698 13.132a.25.25 0 00.22.368h12.164a.25.25 0 00.22-.368L8.22 1.754zm-1.763-.707c.659-1.234 2.427-1.234 3.086 0l6.082 11.378A1.75 1.75 0 0114.082 15H1.918a1.75 1.75 0 01-1.543-2.575L6.457 1.047zM9 11a1 1 0 11-2 0 1 1 0 012 0zm-.25-5.25a.75.75 0 00-1.5 0v2.5a.75.75 0 001.5 0v-2.5z"></path></svg></span>
   <span class="Toast-content">You can include alert boxes</span>
</div>

<p>…and…</p>

<div class="Toast">
   <span class="Toast-icon"><svg class="octicon octicon-info" viewBox="0 0 16 16" version="1.1" width="16" height="16" aria-hidden="true"><path fill-rule="evenodd" d="M8 1.5a6.5 6.5 0 100 13 6.5 6.5 0 000-13zM0 8a8 8 0 1116 0A8 8 0 010 8zm6.5-.25A.75.75 0 017.25 7h1a.75.75 0 01.75.75v2.75h.25a.75.75 0 010 1.5h-2a.75.75 0 010-1.5h.25v-2h-.25a.75.75 0 01-.75-.75zM8 6a1 1 0 100-2 1 1 0 000 2z"></path></svg></span>
   <span class="Toast-content">You can include info boxes</span>
</div>

<h2 id="images">Images</h2>

<p><img src="/images/logo.png" alt="" title="fast.ai's logo" /></p>

<h2 id="code">Code</h2>

<p>General preformatted text:</p>

<div class="language-plaintext highlighter-rouge"><div class="highlight"><pre class="highlight"><code># Do a thing
do_thing()
</code></pre></div></div>

<p>Python code and output:</p>

<div class="language-python highlighter-rouge"><div class="highlight"><pre class="highlight"><code><span class="c1"># Prints '2'
</span><span class="k">print</span><span class="p">(</span><span class="mi">1</span><span class="o">+</span><span class="mi">1</span><span class="p">)</span>
</code></pre></div></div>

<div class="language-plaintext highlighter-rouge"><div class="highlight"><pre class="highlight"><code>2
</code></pre></div></div>

<h2 id="tables">Tables</h2>

<table>
  <thead>
    <tr>
      <th>Column 1</th>
      <th>Column 2</th>
    </tr>
  </thead>
  <tbody>
    <tr>
      <td>A thing</td>
      <td>Another thing</td>
    </tr>
  </tbody>
</table>

<h2 id="footnotes">Footnotes</h2>

<div class="footnotes" role="doc-endnotes">
  <ol>
    <li id="fn:1" role="doc-endnote">
      <p>This is the footnote. <a href="#fnref:1" class="reversefootnote" role="doc-backlink">&#8617;</a></p>
    </li>
  </ol>
</div>]]></content><author><name></name></author><summary type="html"><![CDATA[Here’s the table of contents:]]></summary></entry></feed>